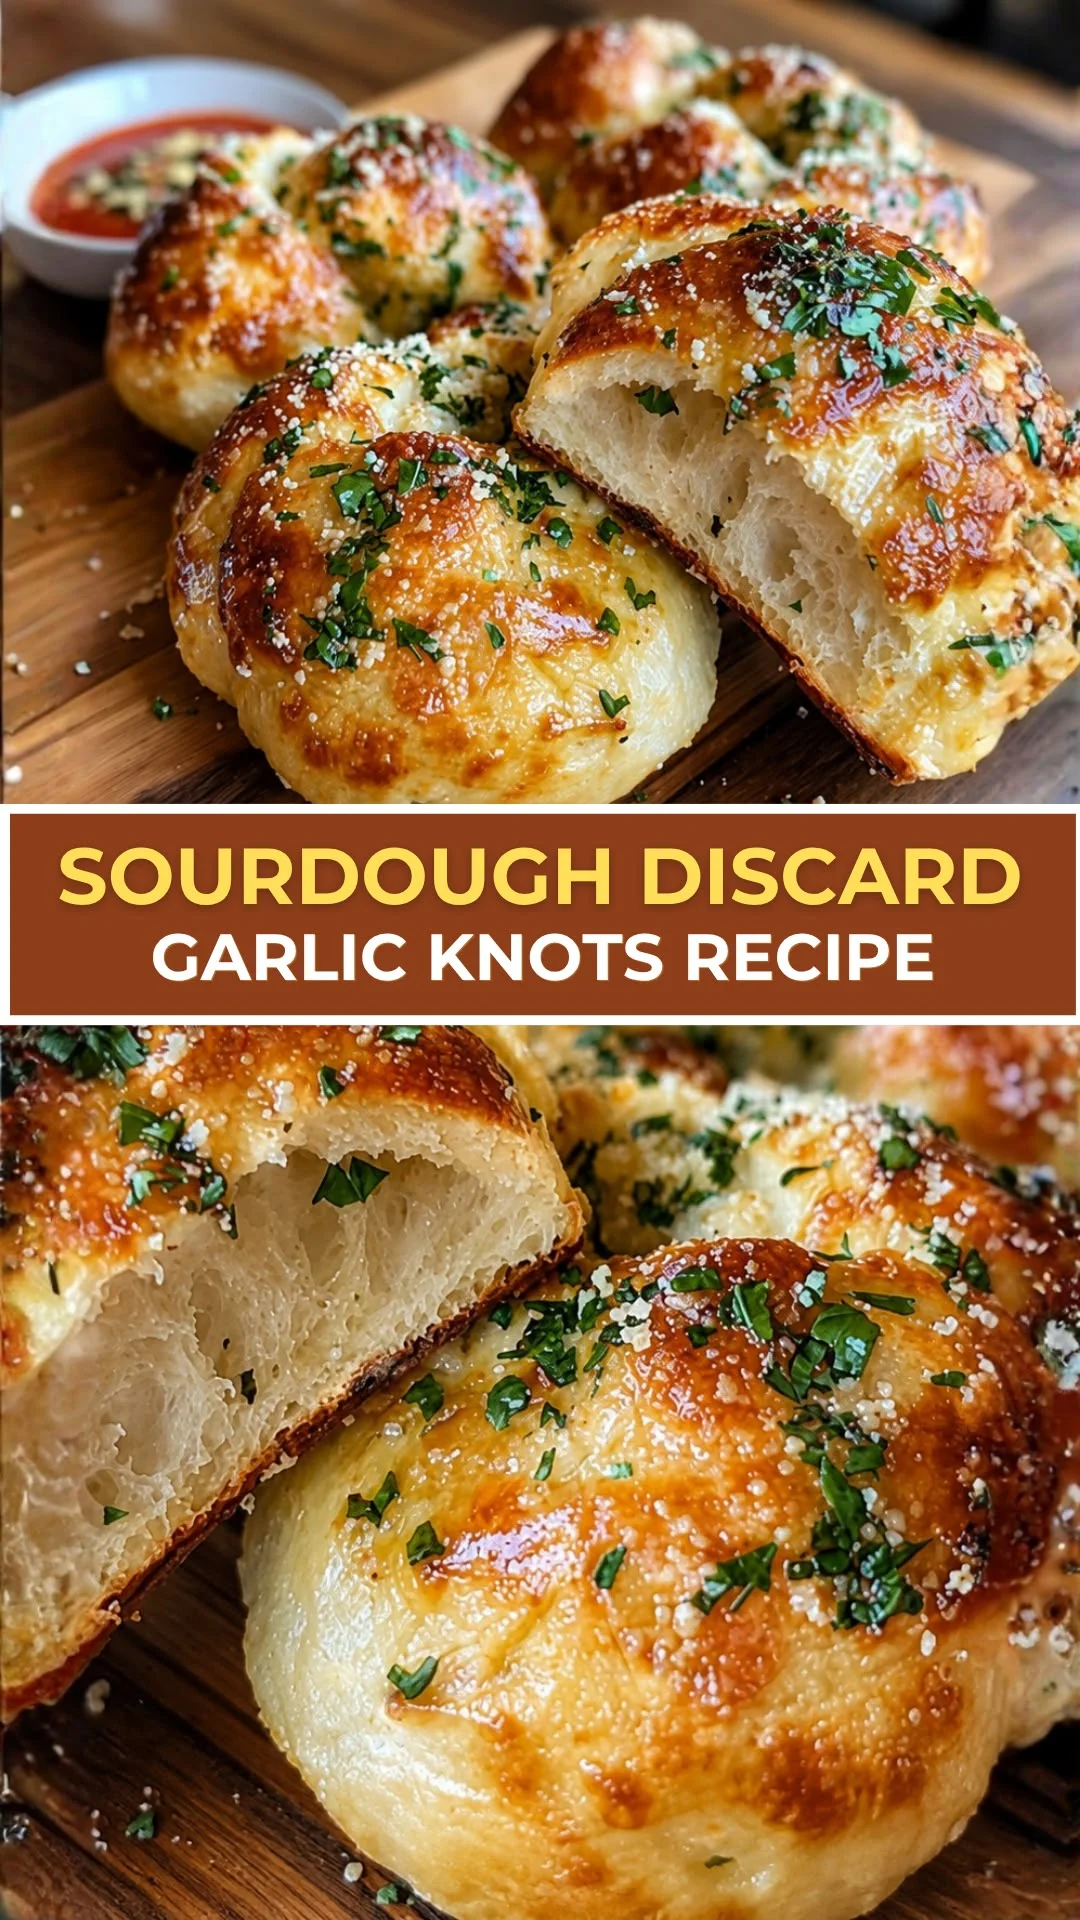
THE BEST N°1 Sourdough Discard Garlic Knots Recipe – Soft, Cheesy & Better Than Takeout
If you have a jar of sourdough starter sitting in your fridge, you already have the secret ingredient to the most addictive garlic knots you will ever make at home. This sourdough discard garlic knots recipe transforms what most bakers throw away into something soft, chewy, garlicky, and absolutely loaded with flavor. One bite and you will never order the takeout version again.
What makes these garlic knots different is the tang and depth that sourdough discard brings to the dough. Combined with melted butter, fresh garlic, and a generous shower of Parmesan, these knots have layers of flavor that store-bought dough simply cannot replicate. They are also a brilliant way to reduce food waste without sacrificing anything on taste.
In this post you will find the full step-by-step recipe, a detailed guide on batch prepping and storage, tips on avoiding common mistakes, flavor variations, ingredient benefits, and everything you need to make these a regular part of your baking routine. Whether you are a sourdough veteran or a curious beginner, this recipe is going to become a staple.
Table of Contents
Personal Note
I started baking sourdough bread during a long winter stretch when I wanted something deeply satisfying to do with my hands and my weekends. The bread was wonderful, but I quickly realized the discard routine was becoming its own kind of problem. Every week I had a growing cup of discard that I felt guilty throwing away.
That guilt turned into creativity. I started testing discard in everything, from pancakes to crackers, but nothing hit quite like these garlic knots. The first batch I pulled out of the oven was so good that my family finished all twelve in under ten minutes. I stood there laughing and slightly amazed at what a little fermented flour could do.
Now these garlic knots are a weekly ritual in my kitchen. They pair with pasta nights, soup dinners, holiday spreads, and honestly they are good enough to eat completely on their own. If you have been on the fence about using your discard for something beyond pancakes, this is the recipe that will convert you.
Origins of the Dish
Garlic knots as we know them today are widely believed to have originated in New York City pizza shops, most likely in the 1970s and 1980s. Pizza makers looking for a way to use leftover pizza dough trimmed during pie preparation would twist it into knots, bake it, and toss it in garlic butter. What started as a zero-waste kitchen move became one of the most beloved Italian-American snacks in the country.
The roots of garlic bread itself go much deeper, tracing back to Italian cuisine where bread was a sacred staple. Italians have long rubbed toasted bread with raw garlic cloves and drizzled it with olive oil, a preparation called fettunta in Tuscany. The American adaptation layered on butter and herbs, and the result became something entirely its own. Garlic knots were the natural evolution of that love for garlic-saturated bread.
Sourdough itself has a history stretching back thousands of years, with evidence of naturally leavened bread found in ancient Egypt around 1500 BCE. Long before commercial yeast existed, every culture that baked bread relied on wild fermentation to make dough rise. The sourdough starter was a living household tool passed down through generations, and wasting the discard was simply not something people did. Frugal bakers found uses for every bit of it.
Combining these two traditions, the Italian-American garlic knot and the time-honored practice of sourdough baking, creates something that honors both food cultures beautifully. The tang of sourdough discard adds a complexity to garlic knot dough that no store-bought yeast dough can match. It is a modern recipe built on centuries of baking wisdom, and it fits perfectly into a thoughtful, from-scratch baking practice.
Why You’ll Love This Recipe
These sourdough discard garlic knots check every box a home baker could want. Here is exactly why this recipe deserves a permanent spot in your rotation.
- Uses sourdough discard: Stops you from wasting perfectly good fermented starter every time you feed your sourdough.
- Incredible flavor: The natural tang from the discard gives the dough a depth that regular garlic knots just do not have.
- Soft and chewy texture: The fermentation in the discard creates a tender crumb with a lightly crispy exterior that is completely satisfying.
- Better than takeout: Fresh from the oven, hot, buttery, and garlicky – these blow any pizza shop version out of the water.
- Simple ingredients: You likely have everything in your pantry already, flour, butter, garlic, Parmesan, and basic pantry staples.
- Freezer-friendly: These knots freeze beautifully, making them perfect for batch baking and quick weeknight sides.
- Versatile: Serve them with pasta, soups, salads, or as a standalone snack with dipping sauce. They fit any meal.
- Beginner-friendly: The dough is forgiving and the shaping technique is simple once you do it once. No special tools needed.
- Customizable: Change up the herbs, add cheese inside the knot, or make them spicy. The base recipe adapts easily.
- Crowd-pleasing: These disappear at every gathering, every single time. Kids love them, adults love them, everyone loves them.
Health Benefits and Ingredient Highlights
Every ingredient in this recipe plays a role, not just in flavor and texture, but in the overall quality of what you are putting in your body. Here is a closer look at why these ingredients matter.
Sourdough Discard
Sourdough discard is not just a byproduct of starter maintenance. It is partially fermented flour and water that carries the work of wild yeast and beneficial bacteria. The fermentation process begins to break down phytic acid, an antinutrient found in grains that can interfere with mineral absorption.
Because of this partial fermentation, sourdough products may be easier on digestion compared to breads made with commercial yeast. The lactic acid bacteria present in the starter contribute to a slightly lower glycemic response than conventional bread dough. Even in discard form, these benefits carry through to your final baked product.
Beyond the nutritional angle, discard adds a distinct tangy flavor and a more complex aroma to baked goods. It contributes to better browning and a tender crumb structure that makes these garlic knots exceptionally soft on the inside with a light crust outside.
All-Purpose Flour
All-purpose flour provides the structural backbone of the dough. Its moderate protein content, typically between 10 and 12 percent, creates enough gluten development to give the knots their characteristic chew without making them tough or dense.
You can also use bread flour if you want a slightly chewier, more robust texture. Bread flour has a higher protein content which strengthens the gluten network and gives a better rise. For a more delicate, softer bite, all-purpose is the sweet spot for this recipe.
Garlic
Fresh garlic is what separates good garlic knots from truly great ones. Garlic contains allicin, a compound with well-documented antioxidant and anti-inflammatory properties. When you mince or press fresh garlic and combine it with butter, those aromatic compounds bloom and infuse the entire topping with incredible depth.
Using fresh garlic cloves rather than garlic powder in the butter topping makes a noticeable difference in flavor. Garlic powder is great in the dough itself for a subtle background note, but fresh garlic in the finishing butter is what creates that signature punch. The heat of the oven mellows the raw edge while keeping all the aroma intact.
Butter
Butter does two important jobs in this recipe. In the dough it adds richness and tenderness, keeping the interior soft and moist. As a finishing coating on the outside it creates a golden, glossy exterior that crisps lightly at the edges while staying pillowy in the center.
Using unsalted butter gives you full control over the salt level in both the dough and the topping. High quality European-style butter with a higher fat content will produce an even richer result, but standard unsalted butter works perfectly well for a delicious everyday batch.
Parmesan Cheese
Parmesan adds a salty, nutty, umami-rich finish to these knots that takes them from good to unforgettable. It is high in protein and calcium, and its sharp flavor means a little goes a long way. Freshly grated Parmesan melts and crisps on the surface of the knots during the final minutes of baking.
If you want to go a step further, adding a small amount of Parmesan directly into the dough itself creates pockets of savory flavor throughout. A combination of Parmesan on the inside and as a topping is an easy upgrade that makes these knots rival any restaurant version.
Olive Oil
A small amount of olive oil in the dough contributes to a smooth, workable texture and helps keep the baked knots moist. Olive oil is rich in monounsaturated fats and polyphenols, compounds associated with heart health and reduced oxidative stress. In a baked good, its role is primarily textural, but the quality of your olive oil will subtly affect the final flavor.
Using extra virgin olive oil gives a slightly fruity, grassy note that complements the garlic and herb toppings beautifully. It also helps extend the shelf life of the baked knots by keeping the crumb from drying out too quickly after baking.
Ingredients
This recipe makes approximately 12 garlic knots. Here is everything you need.
For the Dough:
- 1 cup (240g) sourdough discard, unfed and at room temperature (use discard that is no more than 1 week old)
- 2 and 1/4 teaspoons (7g) instant yeast (or active dry yeast, proofed first in warm water)
- 1/2 cup (120ml) warm water, around 100-110°F
- 2 cups (240g) all-purpose flour, plus more for kneading (substitute bread flour for chewier texture)
- 1 teaspoon fine sea salt
- 1 teaspoon granulated sugar (helps activate the yeast and aids browning)
- 2 tablespoons olive oil (substitute avocado oil or melted coconut oil)
- 1/2 teaspoon garlic powder (optional, for added depth in the dough)
For the Garlic Butter Topping:
- 4 tablespoons (57g) unsalted butter, melted (substitute vegan butter for dairy-free version)
- 4 cloves fresh garlic, finely minced (or 1 teaspoon garlic powder in a pinch)
- 2 tablespoons fresh flat-leaf parsley, finely chopped (substitute 1 teaspoon dried parsley)
- 1/2 teaspoon fine sea salt
- 1/4 teaspoon red pepper flakes (optional, for a gentle kick)
- 1/3 cup (30g) freshly grated Parmesan cheese (substitute nutritional yeast for dairy-free)
Step-by-Step Instructions
- Activate the yeast: Combine the warm water, sugar, and instant yeast in a small bowl or measuring cup. Stir gently and let it sit for 5 minutes until it looks foamy and active. If using active dry yeast, this proofing step is essential to confirm the yeast is alive before proceeding.
- Mix the dough: In a large mixing bowl, combine the sourdough discard, olive oil, and the activated yeast mixture. Stir well to combine everything into a rough slurry. Add the flour, salt, and garlic powder, then stir until a shaggy dough forms and pulls away from the sides of the bowl.
- Knead the dough: Turn the dough out onto a lightly floured surface and knead for 8 to 10 minutes by hand until the dough is smooth, slightly tacky, and elastic. If using a stand mixer with a dough hook, knead on medium speed for 6 to 7 minutes. The dough should pass the windowpane test, stretching thin without tearing.
- First rise: Shape the dough into a ball and place it in a lightly oiled bowl. Cover it with plastic wrap or a clean damp kitchen towel and let it rise at room temperature for 60 to 90 minutes, or until it has roughly doubled in size. The sourdough discard will contribute to a slightly more complex, active fermentation than regular dough.
- Prepare your baking surface: Line two large baking sheets with parchment paper or lightly grease them with olive oil. Preheat your oven to 400°F (200°C). Having the oven fully preheated before you shape the knots ensures even baking and proper oven spring.
- Divide the dough: Punch down the risen dough to release the gas. Turn it out onto a lightly floured surface and divide it into 12 equal pieces using a bench scraper or sharp knife. Try to keep the pieces as equal in size as possible so they bake evenly across the pan.
- Shape the knots: Roll each piece of dough into a rope about 8 to 9 inches long. Tie the rope into a simple overhand knot, then tuck both ends under the bottom of the knot to secure them. This tuck prevents the knots from unraveling as they bake and gives them that classic puffy, pillowed shape.
- Second rise: Place the shaped knots on the prepared baking sheets with about 2 inches of space between each one. Cover loosely with plastic wrap and let them rest for 20 to 30 minutes. This short second rise allows the gluten to relax and gives the knots a noticeably lighter, more tender final texture.
- Make the garlic butter: While the knots rest, combine the melted butter, minced garlic, parsley, salt, and red pepper flakes in a small bowl. Stir well and set aside. You can also gently warm the mixture in a small saucepan over low heat for 2 minutes if you want to mellow the rawness of the garlic slightly before baking.
- Brush and bake: Brush each knot generously with half of the garlic butter mixture just before they go into the oven. Bake at 400°F for 16 to 20 minutes, until the knots are golden brown on top and cooked through. Rotate the pans halfway through if your oven runs hot on one side.
- Finish with toppings: As soon as the knots come out of the oven, brush them immediately with the remaining garlic butter while they are still hot. This second coat is where all the flavor magic happens. Sprinkle the grated Parmesan over the top while the butter is still wet so it clings to every surface.
- Rest and serve: Let the knots cool on the pan for 3 to 5 minutes before serving. They are best eaten warm when the butter is fragrant, the interior is soft and pillowy, and the Parmesan has just set on the outside. Serve with marinara sauce, garlic aioli, or alongside your favorite pasta dish.
Make It Ahead and Batch Prep Guide
These sourdough discard garlic knots are an ideal candidate for batch baking because they store and reheat beautifully. If you are feeding a crowd or simply want a stash of ready-to-go snacks and sides throughout the week, making a double or triple batch on the weekend is one of the best uses of your baking time.
The easiest make-ahead approach is to prepare the dough through the shaping step and then refrigerate the shaped unbaked knots on a parchment-lined tray, covered tightly with plastic wrap. They can sit in the fridge for up to 18 hours. When you are ready to bake, pull them out 30 to 40 minutes before baking to take the chill off and allow them to puff up slightly before going into the oven.
You can also freeze the unbaked shaped knots. After shaping, place the tray in the freezer for 1 to 2 hours until the knots are frozen solid, then transfer them to a zip-lock freezer bag or airtight container. When ready to bake, thaw overnight in the refrigerator, let them come to room temperature and rise for 45 to 60 minutes, then bake as directed. This method gives you completely fresh results whenever you need them. Sourdough Discard Cinnamon Rolls Recipe
If you prefer to batch bake fully and reheat, you can bake a full batch, cool them completely, and store them in the freezer for up to 3 months. Reheat directly from frozen in a 350°F oven for 10 to 12 minutes, then finish with fresh garlic butter straight out of the oven. The texture comes back beautifully with this method, and the second application of garlic butter ensures they never taste like reheated leftovers.
Common Mistakes to Avoid
- Using discard that is too old: Discard older than 10 to 14 days can develop overpowering acidity and off flavors. Use fresh-ish discard stored properly in the refrigerator and your knots will have the right level of tang without being sour or unpleasant.
- Skipping the second rise: The short rest after shaping is not optional. Skipping it means the gluten is too tense and the knots will bake up dense and tough instead of light and pillowy. Even 20 minutes makes a significant difference.
- Not kneading enough: Under-kneaded dough lacks the gluten structure needed to trap gas and rise properly. If your dough tears easily when stretched or is still very sticky and rough after 5 minutes of kneading, keep going until it is smooth and slightly tacky.
- Adding too much flour: It is tempting to keep adding flour when dough feels sticky, but over-flouring produces dry, dense knots. The dough should feel slightly tacky but not stick aggressively to your hands. Trust the process and resist the urge to flour excessively.
- Applying garlic butter too early in baking: Brushing garlic butter at the very start of baking can cause the garlic to scorch and turn bitter before the dough has a chance to cook through. Apply one coat just before baking and save the second, more generous coat for the moment they come out of the oven.
- Underbaking for a pale look: Many home bakers pull their knots out too early because they are afraid of burning them. A deep golden color is what you want. A fully baked knot has a slight crust that gives way to a soft interior, while an underbaked one will be gummy and doughy in the center.
Notes, Tips and Variations
Substitutions
If you do not have sourdough discard on hand, you can substitute it with plain Greek yogurt thinned slightly with water to match the consistency. The flavor will be slightly different but you will still get a nice tang and tenderness in the final dough. A buttermilk substitute works similarly and adds a pleasant richness.
Bread flour can replace all-purpose flour for a chewier, more artisan texture. If you want a slightly lighter, more tender bite, swap out 1/4 cup of the all-purpose flour with bread flour. Whole wheat flour can replace up to 30 percent of the all-purpose without drastically changing the texture, though it will produce a denser, earthier knot.
Dietary Variations
To make these knots dairy-free, replace the butter with a high-quality vegan butter, such as Miyoko’s or Earth Balance, and swap the Parmesan for nutritional yeast or a vegan Parmesan alternative. The garlic and herb flavors will still shine through and the texture of the dough remains unchanged.
For an egg-free version, which this recipe already is, you are all set. These knots contain no eggs in the base recipe, making them naturally suitable for those avoiding eggs. If you want extra richness without dairy, a drizzle of good extra virgin olive oil in place of some of the butter in the topping adds a lovely fruity note. Easy Sourdough Discard Focaccia Recipe
Cooking Tips
For the most even bake, use a light-colored aluminum baking sheet rather than a dark pan. Dark pans absorb more heat and can over-brown the bottoms of the knots before the tops are done. If you only have dark pans, double-pan them by nesting one inside another to create an insulating air gap.
To get an extra golden, shiny top without an egg wash, brush the knots with a thin coat of olive oil right before they go in the oven in addition to the garlic butter. This combination promotes excellent browning and a beautiful glossy surface. If you want a softer crust on the exterior, tent the baked knots loosely with foil for the first 3 to 4 minutes after they come out of the oven.
Topping Ideas and Flavor Boosters
The base garlic butter and Parmesan combination is a classic for good reason, but these knots are extremely adaptable. Here are over ten ways to build on the flavor base.
- Everything bagel seasoning: Brush with butter and top generously with everything bagel blend before baking for a bold, seedy crust.
- Roasted garlic butter: Swap fresh minced garlic for slow-roasted garlic paste for a sweeter, more mellow garlic flavor that is less sharp and deeply caramelized.
- Pesto drizzle: After baking, drizzle homemade or store-bought basil pesto over the warm knots for an herbaceous finish.
- Truffle oil and Parmesan: Add a few drops of white truffle oil to the garlic butter and finish with shaved Parmesan for an elevated, restaurant-quality result.
- Spicy harissa butter: Mix 1 teaspoon of harissa paste into the melted butter before brushing for a North African-inspired heat that pairs beautifully with the tangy dough.
- Mozzarella stuffed: Press a small cube of fresh mozzarella into the center of each knot before shaping to create a molten cheese pull in every bite.
- Za’atar and olive oil: Skip the butter and brush with olive oil, then top with za’atar seasoning for a herby, tangy Middle Eastern twist.
- Sun-dried tomato and basil: Fold finely chopped sun-dried tomatoes and fresh basil into the butter topping for a rich, Italian-inspired variation.
- Cinnamon sugar (sweet version): Swap the savory topping for cinnamon-sugar butter to turn these into a sweet pull-apart treat perfect for brunch.
- Lemon zest and thyme: Add freshly grated lemon zest and fresh thyme leaves to the garlic butter for a bright, aromatic version that pairs brilliantly with grilled fish or chicken dishes.
- Asiago and rosemary: Replace Parmesan with finely grated Asiago cheese and sprinkle fresh rosemary needles over the top before baking for a fragrant, rustic variation.
Who This Recipe Is For
This recipe was written to be useful for a wide range of home bakers. Here is a quick breakdown of who will love it most.
- Sourdough bakers who maintain a starter and have regular discard to use up.
- Beginner bread bakers who want an approachable, forgiving recipe with big results.
- Home cooks who want to add more scratch-made sides to their weekly meal rotation.
- Meal preppers who want a freezer-friendly bread option that reheats with minimal effort.
- Families with kids who need a crowd-pleasing, easy-to-eat side that everyone will devour.
- Dinner party hosts who want an impressive homemade bread to set alongside a larger spread.
- Zero-waste bakers who are intentional about using every part of their sourdough starter.
- Pizza and pasta lovers who want a homemade garlic knot to complete their Italian-inspired meals.
Storage and Meal Prep Tips
Refrigerator
Fully baked garlic knots can be stored in an airtight container at room temperature for up to 2 days. If you need them to last longer, transfer them to the refrigerator where they will keep well for up to 5 days. Store them in a zip-lock bag or airtight container to prevent them from drying out.
One tip for refrigerator storage is to add a folded paper towel inside the bag to absorb any excess moisture. This prevents the knots from becoming soggy on the outside while keeping them from drying out completely. When you are ready to eat, a quick reheat restores them almost entirely to their fresh-baked state.
Freezer
Baked garlic knots freeze exceptionally well. Let them cool completely to room temperature after baking, then arrange them in a single layer on a baking sheet and freeze for 1 hour until solid. Transfer to a labeled freezer bag or airtight container and freeze for up to 3 months.
For best results, do not add the Parmesan topping before freezing. Instead, freeze the knots with just the garlic butter coating, then add fresh Parmesan after reheating. This keeps the cheese from becoming grainy or overly salty after the freeze-thaw process.
Reheating
The best way to reheat garlic knots from the refrigerator is in a 350°F oven for 6 to 8 minutes until warmed through and the exterior has crisped back up. Wrap them loosely in foil if you prefer a softer crust, or leave them uncovered for a crispier finish. Either way, brush with a fresh coat of garlic butter before reheating for maximum flavor.
From frozen, bake directly from frozen at 350°F for 12 to 15 minutes. No thawing required. Finish with fresh garlic butter and Parmesan straight out of the oven and they will taste like you just made them. Avoid the microwave if possible as it tends to make the exterior chewy and the texture uneven.
Nutrition Facts
Nutrition information is estimated per garlic knot (1 of 12 knots) based on the base recipe with garlic butter and Parmesan topping. Values will vary based on specific brands and any substitutions made.
| Nutrient | Amount Per Serving |
|---|---|
| Calories | 185 kcal |
| Total Fat | 7g |
| Saturated Fat | 3.5g |
| Total Carbohydrates | 26g |
| Dietary Fiber | 1g |
| Total Sugar | 1g |
| Protein | 5g |
| Sodium | 310mg |
| Calcium | 60mg |
| Iron | 1.4mg |
FAQs
Can I make sourdough discard garlic knots without commercial yeast?
Yes, you can, but you will need an active, recently fed sourdough starter rather than pure discard. Unfed discard does not have enough active wild yeast on its own to reliably leaven a yeasted dough without commercial yeast assistance. If you want a fully wild-leavened version, use 200g of active bubbly starter, omit the commercial yeast, and extend the first rise to 4 to 6 hours at room temperature or overnight in the refrigerator. The result will have a more pronounced sourdough tang and a slightly denser texture, but it works beautifully with patience.
How old can my sourdough discard be before it is too old to use?
Discard stored in the refrigerator is generally fine to use for up to 10 to 14 days as long as it smells pleasantly sour and has no visible mold. Very old discard, 3 to 4 weeks old, will have a very strong acetone or alcohol-like smell and extremely sharp acidity that can make your baked goods taste unpleasantly sour. For garlic knots you want a mild to moderate tang, so fresh discard from the past week is always the best choice.
Can I use whole wheat flour instead of all-purpose?
You can swap up to 30 percent of the all-purpose flour with whole wheat flour without significantly impacting the texture. Going beyond that will produce a noticeably denser, heavier knot because whole wheat flour has higher fiber content which interferes with gluten development. If you do use whole wheat, increase the water by about 1 to 2 tablespoons to account for the extra absorption and let the dough rest for 5 minutes after mixing before kneading to allow the bran to hydrate fully.
Why did my garlic knots come out dense instead of soft and fluffy?
Dense garlic knots are almost always the result of one of three things: under-kneaded dough that lacks proper gluten development, too much flour added during kneading which dries out the dough, or skipping or shortening the rise times so the dough has not had a chance to develop properly. Check that your yeast is active and bubbly before adding it to the dough, make sure the dough passes the windowpane test after kneading, and always give the shaped knots their full second rest before baking. Following all three steps consistently will guarantee light, pillowy results every time. Sourdough Discard Pizza Dough Recipe
Can I make these garlic knots without a stand mixer?
Absolutely. The dough comes together just as well with hand kneading and in many ways hand kneading gives you better feedback on the dough’s texture and development. Mix the ingredients in a large bowl until a shaggy dough forms, then turn it out onto a floured surface and knead firmly for 8 to 10 minutes. The dough will transform from rough and lumpy to smooth and silky with consistent effort. A bench scraper is helpful for keeping the dough together during the first few minutes of kneading before the gluten develops.
Conclusion
This sourdough discard garlic knots recipe is proof that the best baking often starts with the simplest intentions. What began as a way to avoid wasting starter has become one of the most requested things to come out of my kitchen. The combination of tangy sourdough dough, rich garlic butter, and salty Parmesan creates something genuinely special, something that no takeout version has ever quite managed to replicate.
The process is straightforward enough for a weeknight bake and impressive enough to serve at a dinner party. You can prep the dough ahead, freeze a batch for later, or customize the toppings to match whatever you are serving. Every element of this recipe is designed to work for real home bakers with real lives.
Pull out that jar of discard from the back of your fridge, preheat your oven, and give yourself permission to make something extraordinary out of something you would have thrown away. Once you taste these fresh from the oven, brushed with that second coat of garlic butter and finished with a snowfall of Parmesan, you will understand completely why this recipe has earned a permanent spot in the rotation. Happy baking.