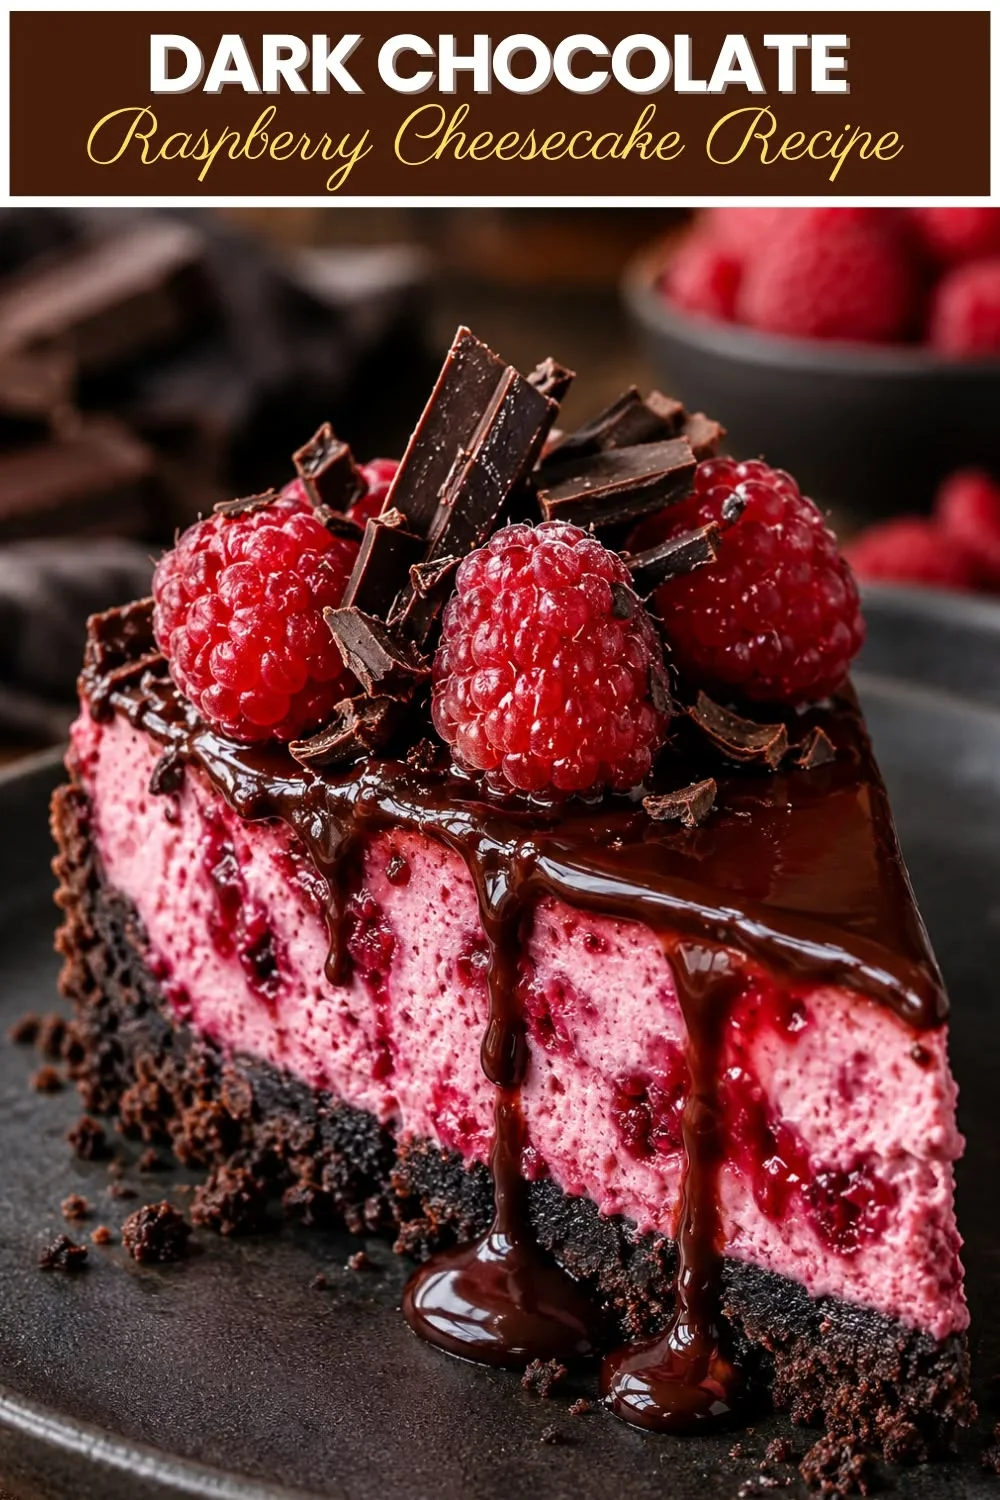
THE BEST N°1 Decadent Dark Chocolate Raspberry Cheesecake Recipe: Rich & Creamy
If you have ever wanted a dessert that stops people mid-bite, this dark chocolate raspberry cheesecake is exactly what you need. It combines a crisp chocolate cookie crust, a silky dark chocolate cheesecake filling, and a bright raspberry swirl that cuts through the richness in the most satisfying way.
This recipe is designed to impress without overwhelming you. Whether you are baking for a dinner party, a birthday, or just a weekend treat, every step here is clear, detailed, and beginner-friendly.
In this post, you will find the full ingredient list, step-by-step instructions, batch prep tips, storage guidance, common mistakes to avoid, and a complete nutrition breakdown. Let’s make the most decadent cheesecake of your life.
Table of Contents
Personal Note
The first time I made this dark chocolate raspberry cheesecake, it was for a friend’s birthday in the middle of February. I wanted something dramatic, something that looked like it belonged in a bakery case but could realistically be made in a home kitchen.
The combination of deep, bittersweet chocolate and tart raspberries felt bold and romantic at the same time. That first slice told me I had something truly special on my hands, and I have been refining this recipe ever since.
What I love most is how versatile it is. You can dress it up with glossy ganache and fresh berries, or keep it simple with a dusting of cocoa powder. Either way, it delivers every single time.
Origins of the Dish
Cheesecake has a history that stretches back further than most people realize. Ancient Greeks on the island of Delos were making a simple cake from fresh cheese, wheat, and honey as far back as 776 BCE. This early version was served to athletes at the first Olympic Games, which tells you just how valued this rich, satisfying dessert was in ancient culture.
When the Romans conquered Greece, they adapted the recipe and spread it across Europe. By the 18th century, cream cheese-based cheesecakes had become popular in England and eventually made their way to America with European immigrants. The New York-style cheesecake, dense and ultra-creamy, became iconic in the late 19th and early 20th centuries thanks to the widespread availability of cream cheese.
Chocolate cheesecake emerged as a natural evolution of the classic. As dark chocolate became a prized baking ingredient in the 20th century, pastry chefs and home bakers alike began folding it into cheesecake batters. The bittersweet depth of dark chocolate paired beautifully with the tangy cream cheese base, creating a richer, more complex dessert.
The addition of raspberry came from the long tradition of pairing chocolate with fruit. Raspberries cut through the heaviness of dark chocolate with their natural acidity and brightness. Today, the dark chocolate raspberry cheesecake stands as one of the most beloved flavor combinations in modern dessert culture, appearing on menus at high-end restaurants and home tables alike. Classic New York Cheesecake Recipe
Why You’ll Love This Recipe
This recipe hits every note you want in a showstopper dessert. Here is a quick look at why it belongs in your regular rotation.
- Incredible flavor contrast – The bitter depth of dark chocolate plays perfectly against the bright tartness of raspberries.
- Silky smooth texture – Properly mixed cream cheese and eggs create a filling that melts on your tongue.
- Stunning visual appeal – The raspberry swirl on top makes every slice look like edible art.
- Make-ahead friendly – This cheesecake actually tastes better the next day after the flavors meld in the fridge.
- Freezer-friendly – Slice and freeze for effortless dessert prep that lasts up to 2 months.
- Crowd-pleasing – This recipe consistently earns compliments at every gathering, no exceptions.
- Customizable – Swap the raspberry for strawberry, blackberry, or cherry with zero changes to the base recipe.
- No-water-bath option – With the right technique, you can skip the fussy water bath and still get a crack-free top.
- Beginner-accessible – The instructions are detailed enough that even first-time cheesecake bakers can succeed.
- Scales easily – Make mini cheesecakes in a muffin tin using the same recipe for portable, single-serve portions.
Health Benefits and Ingredient Highlights
Every ingredient in this cheesecake was chosen for flavor and quality. Here is a closer look at what each key component brings to the table.
Dark Chocolate (70% Cacao or Higher)
Dark chocolate at 70% cacao or higher is rich in flavonoids, which are plant compounds associated with antioxidant activity. When you choose high-quality dark chocolate for this recipe, you get a deeper, more complex flavor that cheap chocolate simply cannot replicate.
The natural bitterness of dark chocolate balances the sweetness of the cheesecake filling. It also melts smoothly into the batter without seizing, giving you that glossy, velvety texture that defines a great chocolate cheesecake.
Beyond flavor, dark chocolate contains iron, magnesium, and zinc in meaningful amounts. Choosing quality over quantity here truly makes a difference in both taste and experience.
Cream Cheese
Full-fat cream cheese is the backbone of any great cheesecake. It provides the rich, dense, tangy base that makes this dessert so satisfying. Skimping on fat here will give you a thinner, less stable filling that lacks depth.
Cream cheese is a source of calcium and fat-soluble vitamins like vitamin A. The fat content is what allows the cheesecake to set properly and hold its shape when sliced.
Always use room-temperature cream cheese. Cold cream cheese will leave lumps in your batter no matter how long you mix it, and lumps are the enemy of a smooth cheesecake.
Fresh Raspberries
Raspberries are one of the most nutrient-dense fruits you can use in baking. They are high in vitamin C, manganese, and dietary fiber, which supports digestive health.
Their natural tartness is what makes them such a perfect partner for dark chocolate and rich cream cheese. That bright acidity cuts through the heaviness and refreshes the palate between bites.
You can use fresh or frozen raspberries in this recipe. Frozen work particularly well for the swirl sauce because they break down quickly and create a smooth, vibrant puree.
Eggs
Eggs are the structural glue that holds your cheesecake together. They provide protein that sets during baking, giving the cheesecake its firm but creamy texture.
The yolks contribute richness and a beautiful golden color to the batter. Using room-temperature eggs helps them incorporate evenly without over-aerating the mixture, which can cause cracks during baking.
Chocolate Cookie Crust
The chocolate cookie crust, typically made from Oreos or chocolate graham crackers, provides a crisp, slightly salty contrast to the creamy filling above. That textural difference is what makes the first bite so exciting.
Butter binds the crumbs together and adds richness. When baked briefly before adding the filling, the crust firms up into a solid base that slices cleanly every time.
Sour Cream
A generous amount of sour cream in the batter is a classic trick used by professional pastry chefs. It makes the filling creamier, slightly tangy, and more stable in the oven.
Sour cream also helps the cheesecake bake more evenly and reduces the risk of a dry or grainy texture. It is one of those ingredients that works quietly in the background but makes an enormous difference in the final product.
Ingredients
These quantities are designed for a standard 9-inch springform pan, yielding 12 generous slices.
For the Chocolate Cookie Crust:
- 2 cups chocolate sandwich cookie crumbs, about 24 Oreos (substitute: chocolate graham crackers)
- 5 tablespoons unsalted butter, melted (substitute: coconut oil for a subtle flavor variation)
- 2 tablespoons granulated sugar
- Pinch of fine sea salt
For the Raspberry Swirl Sauce:
- 1 1/2 cups fresh or frozen raspberries
- 3 tablespoons granulated sugar
- 1 tablespoon fresh lemon juice
- 1 teaspoon cornstarch mixed with 1 teaspoon cold water (for thickening)
For the Dark Chocolate Cheesecake Filling:
- 32 oz (4 blocks) full-fat cream cheese, completely softened to room temperature
- 1 cup granulated sugar (substitute: 3/4 cup coconut sugar for a deeper, caramel-like sweetness)
- 1/3 cup sour cream, room temperature (substitute: full-fat Greek yogurt)
- 1/3 cup heavy cream, room temperature
- 8 oz high-quality dark chocolate, 70% cacao or higher, melted and cooled slightly
- 1/3 cup unsweetened Dutch-process cocoa powder
- 4 large eggs, room temperature
- 2 teaspoons pure vanilla extract
- 1/4 teaspoon fine sea salt
Optional Topping (Chocolate Ganache):
- 4 oz dark chocolate, finely chopped
- 1/2 cup heavy cream
- 1 tablespoon unsalted butter
Step-by-Step Instructions
Follow these steps carefully for a perfect dark chocolate raspberry cheesecake every time. Read through everything before you start.
- Preheat your oven to 325°F (163°C). Position the oven rack in the center of your oven. Grease a 9-inch springform pan lightly with butter and line the bottom with a circle of parchment paper for easy release.
- Make the chocolate cookie crust. Pulse your chocolate sandwich cookies in a food processor until they form fine crumbs. Add the melted butter, sugar, and salt, then pulse again until the mixture looks like wet sand.
- Press and pre-bake the crust. Transfer the crumb mixture to your prepared springform pan and press it firmly and evenly across the bottom and about 1 inch up the sides using the back of a measuring cup. Bake for 10 minutes, then set aside to cool while you make the filling.
- Make the raspberry swirl sauce. Combine the raspberries, sugar, and lemon juice in a small saucepan over medium heat. Stir and cook until the berries break down completely, about 5 to 7 minutes. Stir in the cornstarch slurry and cook for 1 more minute until the sauce thickens slightly. Strain through a fine mesh sieve to remove seeds, then set aside to cool.
- Melt the dark chocolate. Place the chopped dark chocolate in a heatproof bowl set over a pot of barely simmering water. Stir gently until completely smooth, then remove from heat and allow to cool for 10 minutes. You can also use the microwave in 20-second bursts, stirring between each interval.
- Beat the cream cheese. Using a stand mixer fitted with the paddle attachment, or a hand mixer, beat the softened cream cheese on medium speed for 3 to 4 minutes until completely smooth and free of lumps. Scrape down the sides and bottom of the bowl frequently to ensure even mixing.
- Add sugar and cocoa powder. With the mixer on low speed, add the granulated sugar and cocoa powder to the cream cheese. Mix until fully combined, then increase to medium speed for 1 minute. Scrape the bowl again.
- Add the melted chocolate. Pour the cooled melted dark chocolate into the cream cheese mixture and mix on low speed until fully incorporated. The batter will turn a deep, gorgeous chocolate brown at this point.
- Add sour cream, heavy cream, and vanilla. Mix in the sour cream, heavy cream, and vanilla extract on low speed until smooth. These ingredients add creaminess and help the cheesecake bake evenly without cracking.
- Add the eggs last. Add the eggs one at a time on low speed, mixing just until each egg disappears into the batter. Do not over-mix once the eggs go in. Over-beating at this stage incorporates too much air and causes cracks and a spongy texture.
- Pour the filling into the crust. Pour the dark chocolate cheesecake batter over the pre-baked crust and smooth the top with a spatula. Tap the pan gently on the counter a few times to release any air bubbles hiding in the batter.
- Add the raspberry swirl. Drop spoonfuls of the cooled raspberry sauce across the top of the cheesecake batter. Use a toothpick or thin skewer to swirl the sauce gently through the top layer of the batter in a figure-eight motion. Do not over-swirl or the pattern will muddy.
- Wrap the pan and bake. Wrap the outside of the springform pan tightly in two layers of heavy-duty aluminum foil to protect against any leaks. Place the pan inside a large roasting pan and pour about 1 inch of hot water into the roasting pan to create a water bath. This gentle, humid heat environment helps the cheesecake bake without cracking.
- Bake for 60 to 70 minutes. The cheesecake is done when the edges are fully set and the center still has a gentle jiggle when you nudge the pan. It should wobble like gelatin, not like liquid. The center will continue to set as it cools.
- Cool gradually. Turn the oven off and crack the door open by about 1 inch. Leave the cheesecake in the oven for 1 hour without disturbing it. This slow, gradual cooling prevents the dramatic temperature change that causes cracks.
- Cool to room temperature, then refrigerate. Remove the cheesecake from the oven and water bath, run a thin knife around the edge of the pan to release the crust, and allow it to cool to room temperature on a wire rack. Once at room temperature, cover loosely with plastic wrap and refrigerate for at least 6 hours, preferably overnight.
- Make the optional ganache topping. Heat the heavy cream in a small saucepan until it just begins to simmer. Pour it over the chopped dark chocolate in a heatproof bowl and let it sit for 2 minutes without stirring. Add the butter, then whisk from the center outward until you have a smooth, glossy ganache. Allow to cool for 10 minutes before pouring over the chilled cheesecake.
- Slice and serve. Use a sharp knife dipped in hot water and wiped clean between each cut for perfectly smooth, bakery-worthy slices. Add fresh raspberries, a dusting of cocoa powder, or a drizzle of extra raspberry sauce to each plate before serving.
Make It Ahead and Batch Prep Guide
This dark chocolate raspberry cheesecake is one of the best desserts you can make ahead of time. The flavors actually deepen and improve after a night in the refrigerator, making it ideal for prepping before an event or gathering.
You can bake the cheesecake up to 3 days in advance and keep it tightly wrapped in the refrigerator. Hold off on the ganache topping and fresh berry garnish until the day of serving so they look their freshest. This three-day window makes it perfect for holiday prep, birthday planning, or any situation where you want to avoid day-of kitchen stress.
For true batch prep, consider doubling the recipe and baking two cheesecakes at once. Cool both, then slice them into individual portions and wrap each slice in plastic wrap before storing in a zip-lock freezer bag. This gives you individually portioned desserts ready whenever you need them, with no extra work required at mealtime.
If you are making mini cheesecakes for portion control or for party servings, use a standard muffin tin lined with cupcake liners. Reduce the baking time to 18 to 22 minutes and skip the water bath entirely. Mini cheesecakes set up faster and are even easier to freeze and store individually. Mini Chocolate Cheesecake Bites Recipe
Common Mistakes to Avoid
- Using cold cream cheese – Cold cream cheese will never fully smooth out in the mixer, leaving lumps throughout your filling. Always allow it to sit at room temperature for at least 1 to 2 hours before you begin.
- Over-mixing after adding eggs – Beating too aggressively once the eggs are in forces air into the batter. That excess air expands in the oven and then collapses as the cheesecake cools, causing the dreaded sunken or cracked surface.
- Skipping the gradual cooling step – Pulling a hot cheesecake directly from the oven and placing it on a cool counter creates a temperature shock that causes cracking. The slow oven-door method is not optional if you want a perfect top.
- Not wrapping the springform pan well – A single layer of foil is often not enough to prevent water from seeping in during the water bath. Use two tight layers of heavy-duty aluminum foil, or place the pan inside a large oven bag for a completely waterproof seal.
- Using low-quality dark chocolate – Cheap baking chocolate or chocolate chips with added stabilizers will not melt as smoothly and can produce a grainy, dull filling. Invest in a good quality bar chocolate for a noticeably better result.
- Not chilling long enough – A cheesecake needs at least 6 hours in the refrigerator to fully set. Cutting into it before that point will give you a soft, pudding-like center that falls apart on the plate. Overnight chilling is always the best choice.
Notes, Tips and Variations
Substitutions
If you cannot find or do not want to use Oreos for the crust, chocolate graham crackers or even crushed chocolate wafer cookies work beautifully. The goal is a fine, even crumb that packs together when pressed.
For a dairy-free version, use full-fat coconut cream in place of heavy cream and sour cream, and choose a high-quality vegan cream cheese like Violife or Kite Hill. The texture will be slightly softer, but the flavor is still exceptional.
You can replace the fresh raspberries in the swirl with any high-acid berry, including blackberries, strawberries, or sour cherries. Each one creates a different visual and flavor profile while still complementing the dark chocolate base perfectly.
Dietary Variations
To make a gluten-free version, use certified gluten-free chocolate cookies or ground almond flour mixed with cocoa powder and butter for the crust. The filling itself is naturally gluten-free as long as your chocolate and cocoa powder are certified.
For a reduced-sugar variation, replace the granulated sugar with a 1:1 erythritol blend or allulose. These sweeteners perform similarly to sugar in cheesecake without drastically changing the texture, though the finished product will be slightly less sweet on the palate.
Cooking Tips
If you do not have a food processor for making the crust, place the cookies in a zip-lock bag and crush them with a rolling pin. It takes a couple of extra minutes but produces the same fine crumbs.
When swirling the raspberry sauce, less is more. Three to five slow, deliberate figure-eight strokes create a beautiful marbled pattern. Any more than that and the design becomes muddy and indistinct.
Always let your melted chocolate cool to around 90°F before adding it to the cream cheese batter. Too hot and it can partially cook the eggs when they are added later; too cool and it may seize when it hits the dairy ingredients.
Topping Ideas and Flavor Boosters
Once your dark chocolate raspberry cheesecake is chilled and ready to serve, the topping options are nearly endless. Here are some of the best ways to elevate the final presentation and flavor.
- Dark chocolate ganache drizzle – Pour or drizzle a thin stream of glossy ganache over the top for a sophisticated, bakery-style finish.
- Fresh raspberries – Arrange them in a cluster in the center or around the edge of the cheesecake for color and freshness.
- Whipped cream rosettes – Pipe stabilized whipped cream around the outer edge for a classic, elegant look.
- Dusting of Dutch-process cocoa powder – A fine layer of cocoa sifted over the top adds visual depth and intensifies the chocolate aroma.
- Shaved dark chocolate curls – Use a vegetable peeler on a room-temperature chocolate bar to create delicate curls for a dramatic garnish.
- Freeze-dried raspberry powder – Crush freeze-dried raspberries into a fine powder and dust it over the top for vibrant color and concentrated berry flavor.
- Raspberry coulis drizzle – Thin the raspberry swirl sauce with a splash of water and drizzle it artistically over each individual slice when plating.
- Caramelized white chocolate shards – Add a contrasting sweetness and crunch by scattering caramelized white chocolate shards over the top.
- Gold leaf flakes – For a truly luxurious presentation at special events, edible gold leaf adds instant drama.
- Sea salt flakes – A light sprinkle of flaky sea salt over the finished cheesecake elevates the dark chocolate flavor and adds a subtle crunch.
- Toasted coconut flakes – Add a tropical twist with lightly toasted shredded coconut scattered across the top.
Who This Recipe Is For
This cheesecake was designed to fit into many different lives and situations. Here is who will get the most out of making this recipe.
- Home bakers who want to impress – This cheesecake looks professionally made but is completely achievable at home with standard equipment.
- Dessert meal preppers – If you like having something special ready in the freezer for busy weekends, this batch-prep-friendly cheesecake is a perfect fit.
- Chocolate lovers – Two forms of chocolate in one cheesecake means maximum depth of flavor that will satisfy even the most serious chocolate cravings.
- Hosts and entertainers – This recipe is built for make-ahead convenience, so you can focus on your guests instead of your dessert on the day of an event.
- Holiday bakers – Valentine’s Day, Christmas, Easter, and birthdays all call for a dessert this stunning and decadent.
- First-time cheesecake bakers – The step-by-step instructions and common mistake section give beginners everything they need to succeed on the first try.
- Gluten-free dessert seekers – With a simple crust substitution, this recipe accommodates gluten-free needs without sacrificing any flavor or texture.
- Fruit and chocolate pairing enthusiasts – If you love the classic combination of berry and chocolate, this recipe delivers that pairing in its most luxurious form.
Storage and Meal Prep Tips
Refrigerator
Store the finished cheesecake in the refrigerator, covered loosely with plastic wrap or placed in an airtight cake container. It will keep beautifully for up to 5 days. The flavor actually improves from day one to day two, so do not feel pressured to serve it immediately after baking.
If you have already added the ganache topping, store it without covering too tightly to avoid the plastic wrap sticking to the surface. A loose tent of plastic wrap supported by toothpicks around the edge works perfectly.
Freezer
This dark chocolate raspberry cheesecake freezes exceptionally well. For whole cheesecake freezing, chill it completely in the refrigerator first, then wrap the entire cheesecake tightly in a double layer of plastic wrap followed by a layer of aluminum foil. It will keep in the freezer for up to 2 months without losing quality.
For individual slice freezing, cut the cheesecake into portions and place each slice on a parchment-lined baking sheet. Freeze them uncovered for 1 hour until solid, then wrap each slice individually in plastic wrap and store in a zip-lock freezer bag. This method lets you grab exactly one slice whenever the craving hits. How to Freeze and Store Cheesecake Properly
Reheating
Cheesecake is best served chilled or at room temperature, so “reheating” is not really the right word here. To thaw a frozen slice, place it in the refrigerator overnight. For a quicker option, leave it at room temperature for about 30 to 45 minutes.
Never microwave a frozen cheesecake slice to thaw it. The uneven heat will make the edges rubbery and the center will stay cold and dense. Slow thawing in the fridge always produces the best texture and flavor.
Nutrition Facts
These values are estimates per serving based on 12 slices from a 9-inch cheesecake. Exact values will vary depending on specific brands and ingredient choices.
| Nutrient | Per Serving |
|---|---|
| Calories | 520 kcal |
| Total Fat | 38g |
| Saturated Fat | 22g |
| Total Carbohydrates | 38g |
| Dietary Fiber | 3g |
| Total Sugars | 27g |
| Protein | 9g |
| Sodium | 310mg |
| Calcium | 110mg |
| Iron | 3.5mg |
FAQs
Can I make this cheesecake without a water bath?
Yes, you can skip the water bath, but you will need to take extra precautions to avoid cracking. Reduce the oven temperature to 300°F (149°C), place a separate shallow pan of hot water on the bottom rack of the oven to add humidity, and be especially careful not to over-bake. The water bath method gives the most reliable crack-free result, but the skip-the-bath method works well if you follow these adjustments and are diligent about the gradual cooling step.
Why did my cheesecake crack on top?
Cheesecake cracks usually happen for one of three reasons: over-mixing after adding the eggs, baking at too high a temperature, or cooling too quickly. The good news is that cracks are purely cosmetic and do not affect flavor. You can easily cover any cracks with the chocolate ganache topping or fresh raspberries and no one will ever know. For future batches, pay close attention to the mixing and cooling steps where most cracks originate.
Can I use milk chocolate instead of dark chocolate?
You can, but the result will be noticeably sweeter and less complex. Milk chocolate has a much higher sugar content and lower cacao percentage, which makes the filling taste more like a chocolate mousse than a rich, sophisticated cheesecake. If you prefer a sweeter, milder flavor profile, go ahead and use milk chocolate, but reduce the added sugar in the filling by about 1/4 cup to compensate for the extra sweetness the milk chocolate brings.
How do I know when the cheesecake is done baking?
The best way to check for doneness is the jiggle test. When you gently nudge the pan, the outer 2 to 3 inches should be completely set while the very center still has a soft, gelatin-like wobble. If the entire surface jiggles like liquid, it needs more time. If the top looks puffed and dry with no jiggle at all, it has been over-baked. An instant-read thermometer inserted in the center reading around 150°F to 155°F (65°C to 68°C) also indicates perfect doneness.
Can I use frozen raspberries for the swirl?
Absolutely, and in many cases frozen raspberries are actually preferable for the swirl sauce. They break down more quickly than fresh berries, they are available year-round, and they tend to have a more concentrated berry flavor. Just thaw them before cooking to reduce excess moisture in the pan. The finished swirl sauce will look and taste identical to one made with fresh raspberries.
Conclusion
This dark chocolate raspberry cheesecake is the kind of recipe that becomes a signature. Once you make it, people will request it for every occasion. It has the depth of a professional pastry chef’s creation and the approachability of a home kitchen recipe that any dedicated baker can master.
The combination of a crunchy chocolate cookie crust, an intensely rich dark chocolate filling, and a bright, tangy raspberry swirl creates a dessert that is genuinely greater than the sum of its parts. Every single bite delivers something remarkable.
Give this recipe a try this weekend. Snap a photo of that beautiful raspberry swirl, share it with someone who deserves a beautiful slice, and come back here to leave a comment about how it turned out. Your next showstopper dessert is waiting.