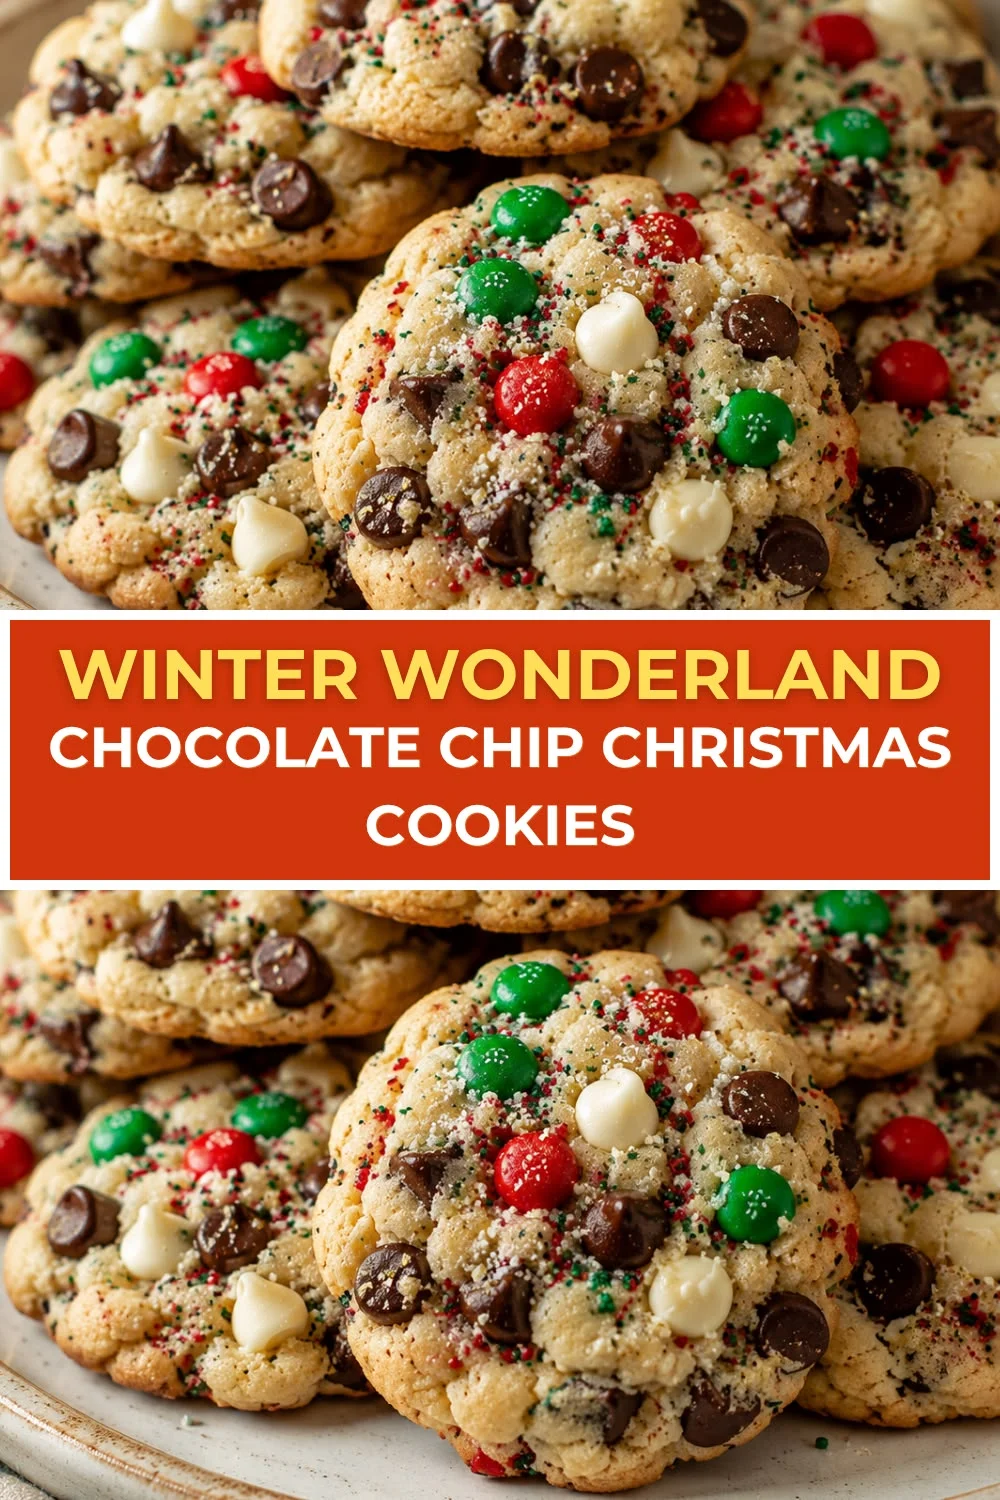
THE BEST N°1 Christmas Chocolate Chip Cookies: Soft, Chewy & Loaded with Holiday Chocolate
There is something truly magical about pulling a fresh batch of Christmas chocolate chip cookies out of the oven when the house smells like butter, vanilla, and warm chocolate. These cookies are the definition of holiday comfort, and once you try this recipe, you will never go back to store-bought again.
This post covers everything you need to make the most irresistible soft and chewy Christmas cookies from scratch. You will get the full ingredient list, step-by-step instructions, batch prep tips, storage guides, and answers to the most common cookie questions.
Whether you are baking for a cookie swap, filling holiday tins for gifts, or just treating your family to something special, this recipe delivers every single time. Get ready to bake your new favorite holiday tradition.
Table of Contents
Personal Note
Every December, my kitchen turns into a full-on cookie factory. The mixer comes out, the butter softens on the counter, and the chocolate chips somehow disappear faster than they make it into the dough. Christmas chocolate chip cookies are the recipe I look forward to baking all year long.
I first made these cookies with my grandmother when I was about eight years old. She had a very specific method, chilling the dough overnight, pressing an extra handful of chips on top before baking, and always making a double batch. I have kept every single one of those habits.
What makes this recipe feel like the holidays is not just the chocolate. It is the care that goes into every batch, the warm kitchen, the little ones sneaking dough off the spoon, and the joy of sharing something homemade. That is what dessert baking is all about.
Origins of the Dish
The chocolate chip cookie has one of the most beloved origin stories in American baking history. Ruth Wakefield, the owner of the Toll House Inn in Whitman, Massachusetts, is credited with inventing the chocolate chip cookie in the 1930s. She chopped up a Nestle semi-sweet chocolate bar and added the pieces to her butter drop do cookie dough, expecting the chocolate to melt fully into the batter. Instead, the chips held their shape, creating the iconic cookie we know today.
Nestle eventually struck a deal with Wakefield, printing her recipe on every bag of chocolate chips in exchange for a lifetime supply of chocolate. That partnership helped catapult the chocolate chip cookie into American kitchens across the country. By the mid-20th century, it had become the most popular homemade cookie in the United States.
The holiday twist on the classic came naturally as home bakers began dressing up their cookie recipes for Christmas. Adding festive red and green M&Ms, crushed candy canes, white chocolate chips, or simply baking them in larger, more generous batches for gifting became beloved seasonal traditions. The idea of the Christmas chocolate chip cookie became its own cultural moment every December.
Today, these cookies sit at the center of holiday baking culture. Cookie swaps, gift tins, bake sales, school parties, and Christmas Eve dessert tables all feature chocolate chip cookies as a staple. The recipe has evolved over decades, with bakers swapping butter ratios, adding brown butter, experimenting with different chocolate percentages, and developing tricks for that perfect chewy center. This version captures the very best of all those discoveries.
Why You’ll Love This Recipe
This recipe was built to deliver maximum flavor with reliable results every time you bake it. Here is exactly why it earns a permanent spot in your holiday recipe rotation.
- Perfectly soft and chewy texture – A higher ratio of brown sugar to white sugar keeps every bite tender and moist.
- Loaded with chocolate – This recipe uses two full cups of chocolate chips so every single bite is packed with rich chocolate flavor.
- No mixer required – You can make these entirely by hand with a bowl and a whisk, which means fewer dishes and easier cleanup.
- Make-ahead friendly – The dough freezes beautifully and can be prepped weeks in advance, making holiday baking stress-free.
- Customizable for any crowd – Swap mix-ins, add festive colors, or adjust the chocolate ratio to suit your holiday guests.
- Beginner-friendly – Clear steps and simple ingredients make this recipe approachable even if you have never baked cookies before.
- Great for gifting – These cookies hold their texture for days and travel well in tins, bags, or boxes.
- Crowd-pleasing every time – Kids, adults, cookie skeptics, and chocolate lovers all agree these are exceptional.
- Reliable results – Every step in this recipe is tested to eliminate the most common cookie failures like spreading too thin or turning hard overnight.
- Scales easily – Double or triple the batch without any complicated math adjustments.
Health Benefits and Ingredient Highlights
These are dessert cookies, and that means we celebrate them for what they truly are – pure, joyful indulgence. That said, the quality of your ingredients matters enormously for both flavor and texture. Here is a closer look at the key ingredients and why each one earns its place in this recipe.
Butter
Real, unsalted butter is the foundation of a great cookie. It contributes rich flavor, creates a tender crumb, and helps the cookies spread just the right amount in the oven. Using melted butter instead of softened butter is a professional baker trick that encourages a chewier, denser final texture.
Quality matters here. European-style butter with a higher fat content will give you an even richer flavor. If you want to take it one step further, browning the butter before adding it to the dough adds a nutty, caramel-like depth that makes these cookies unforgettable.
Brown Sugar
Brown sugar is the secret weapon in chewy cookie recipes. The molasses content in brown sugar attracts moisture, which keeps cookies soft for days after baking. It also adds a rich, toffee-like flavor that pairs beautifully with chocolate.
This recipe uses more brown sugar than white, which is intentional. That ratio is what gives you the golden, slightly caramelized edges with a soft, fudgy center. Dark brown sugar will intensify the molasses flavor even further if you prefer a bolder cookie.
Eggs and Egg Yolk
Using one whole egg plus one extra egg yolk is a technique borrowed from professional pastry kitchens. The extra yolk adds fat and richness without the extra moisture that comes with a full egg, which keeps the cookie dense and chewy rather than cakey.
Eggs also provide structure, binding the dough together so cookies hold their shape. Make sure your eggs are at room temperature before you mix them in for the best results.
All-Purpose Flour
All-purpose flour gives these cookies just enough structure without making them tough or dry. The gluten in flour develops when you mix the dough, which is why over-mixing can ruin a cookie batch. Mix just until the flour disappears and stop right there.
Measuring flour correctly is critical. Spooning flour into your measuring cup and leveling it off prevents dense, dry cookies caused by accidentally packing in too much flour. A kitchen scale is even more reliable if you have one.
Semi-Sweet Chocolate Chips
Semi-sweet chocolate chips are the classic choice for a reason. They balance sweetness with a deep chocolate flavor that does not get lost in the buttery dough. Using a full two cups means you get chocolate in every single bite.
For a premium result, mix in some chopped chocolate bars alongside the chips. Chopped chocolate creates irregular pools of melted chocolate throughout the cookie rather than uniform chips, which gives you a more complex, layered chocolate experience. double chocolate brownie cookies recipe
Vanilla Extract
Pure vanilla extract enhances every other flavor in the cookie. It adds warmth and complexity that makes the chocolate and brown sugar taste even more pronounced. Always use pure vanilla rather than imitation for the cleanest, most authentic flavor.
If you want to lean into the holiday spirit, vanilla bean paste is a beautiful upgrade. It delivers a more intense vanilla flavor and adds those gorgeous little bean specks throughout the dough.
Baking Soda and Salt
Baking soda helps the cookies rise slightly and spread evenly in the oven. Without it, cookies can turn out too flat or too dense. Just a small amount makes a big difference in the final texture.
Salt is not optional. It amplifies sweetness, balances the richness of the butter and chocolate, and makes the overall flavor pop. A sprinkle of flaky sea salt on top right before baking takes these cookies from great to absolutely extraordinary.
Ingredients
This recipe makes approximately 24 generous cookies. Here is everything you need.
- 2 and 1/4 cups (280g) all-purpose flour (spooned and leveled, or use a kitchen scale)
- 1 teaspoon baking soda
- 1 teaspoon fine sea salt (plus flaky sea salt for topping, optional)
- 1 cup (226g) unsalted butter, melted and slightly cooled (substitute: browned butter for extra flavor, or vegan butter for dairy-free)
- 1 cup (200g) packed light brown sugar (substitute: dark brown sugar for a deeper molasses flavor)
- 1/2 cup (100g) granulated white sugar
- 1 large egg, room temperature
- 1 large egg yolk, room temperature (adds extra chewiness)
- 2 teaspoons pure vanilla extract (substitute: vanilla bean paste for a stronger, more complex vanilla flavor)
- 2 cups (340g) semi-sweet chocolate chips (substitute: mix of chips and chopped chocolate bars, or use dark chocolate for a richer flavor)
- Optional holiday mix-ins: 1/2 cup red and green M&Ms, crushed candy cane pieces, or white chocolate chips
Step-by-Step Instructions
- Melt and cool the butter. Melt your butter in a small saucepan over medium heat or in the microwave. Set it aside and allow it to cool for about 10 minutes until it is warm but not hot. Using butter that is too hot will cook the eggs when you add them, which ruins the dough.
- Whisk together the dry ingredients. In a medium bowl, whisk together the flour, baking soda, and salt until evenly combined. Set this bowl aside while you mix the wet ingredients. Pre-mixing the dry ingredients ensures even distribution of the leavening throughout the dough.
- Mix the butter and sugars. In a large bowl, whisk the cooled melted butter with the brown sugar and granulated sugar until smooth and well combined, about 1 full minute. The mixture should look glossy and slightly thick. This step dissolves some of the sugar into the butter, which contributes to that perfect chewy texture.
- Add the egg, yolk, and vanilla. Add the whole egg, the extra egg yolk, and the vanilla extract to the butter-sugar mixture. Whisk vigorously for about 30 seconds until the mixture looks slightly lighter in color and is fully combined. The extra yolk is the key to a fudgy, rich center.
- Fold in the dry ingredients. Add the flour mixture to the wet ingredients all at once. Using a rubber spatula or wooden spoon, fold the dough together until just combined and no dry flour streaks remain. Do not over-mix, as this develops too much gluten and leads to tough cookies.
- Stir in the chocolate chips. Add the chocolate chips (and any optional holiday mix-ins) and fold them into the dough until evenly distributed. Reserve a small handful of chips to press onto the tops of the cookie balls before baking for a more visually appealing finished cookie.
- Chill the dough. Cover the bowl with plastic wrap or a plate and refrigerate the dough for a minimum of 30 minutes, or up to 72 hours. Chilling is non-negotiable for thick, chewy cookies that do not spread into flat pancakes. Overnight chilling delivers the absolute best flavor and texture.
- Preheat your oven. When you are ready to bake, preheat your oven to 375°F (190°C). Line two large baking sheets with parchment paper or silicone baking mats. Avoid greasing the pans, as extra fat encourages spreading.
- Scoop the dough. Use a large cookie scoop (about 3 tablespoons of dough per cookie) to portion the dough onto the prepared baking sheets. Space the cookies about 2 inches apart to allow for spreading. Press a few extra chocolate chips onto the top of each dough ball for that picture-perfect bakery look.
- Bake the cookies. Bake one sheet at a time in the center of the oven for 10 to 12 minutes, until the edges are set and golden but the centers still look slightly underdone and glossy. This is intentional. The cookies continue to cook on the hot pan after they come out of the oven.
- Add flaky salt and cool. As soon as the cookies come out of the oven, sprinkle a tiny pinch of flaky sea salt on top of each one. Let the cookies rest on the baking sheet for 5 full minutes before transferring them to a wire rack. This resting time allows them to firm up without overbaking.
- Serve or store. Enjoy the cookies warm for maximum gooey chocolate enjoyment, or allow them to cool completely before packing them for storage or gifting. These Christmas chocolate chip cookies are at their absolute best within the first 48 hours of baking.
Make It Ahead and Batch Prep Guide
One of the greatest advantages of this recipe is how well it adapts to advance preparation. During the holidays, time is precious, and having cookie dough ready to bake on demand is an absolute game-changer. You can prepare the dough up to three days ahead and keep it refrigerated, covered tightly. The longer it chills, the more complex and developed the flavor becomes, so making it 24 to 48 hours ahead is actually encouraged.
For longer storage, freezing the dough is incredibly effective. Portion the dough into balls as you normally would for baking, then arrange them on a parchment-lined baking sheet and freeze until solid, about 2 hours. Once frozen, transfer the dough balls into a zip-lock freezer bag or airtight container. Label the bag with the date and baking instructions. Frozen cookie dough keeps well for up to 3 months.
When you are ready to bake from frozen, you do not even need to thaw the dough. Place the frozen balls directly on the lined baking sheet and add 2 to 3 extra minutes to the baking time. This is perfect for holiday emergencies, last-minute guests, or just a quiet evening when you want a warm cookie without the full prep work. holiday cookie gift tin recipes
If you are baking for a large crowd or preparing holiday gift tins, doubling or even tripling this recipe is straightforward. Mix the dough in a very large bowl and bake in batches. Keep unbaked dough portions in the refrigerator while each batch bakes. This system lets you produce dozens of fresh, warm Christmas chocolate chip cookies efficiently without sacrificing quality.
Common Mistakes to Avoid
- Skipping the dough chill. Baking the dough straight from mixing produces flat, greasy cookies that spread out too thin. The chill sets the fat so the cookies hold their shape and bake up thick and chewy. Do not skip this step, even if you are in a hurry.
- Over-measuring the flour. Scooping your measuring cup directly into the flour bag packs in way more flour than the recipe requires. This leads to dry, dense, crumbly cookies. Always spoon the flour into the cup and level it off, or better yet, weigh it on a kitchen scale.
- Using hot melted butter. If you add your eggs to butter that is still very hot, the eggs will begin to scramble, which ruins the texture of your dough. Always let the melted butter cool for at least 10 minutes before you proceed with the recipe.
- Over-baking the cookies. Pulling the cookies out when they look fully done means they are already over-baked. The centers should look slightly glossy and underdone when they come out of the oven. They will finish setting on the hot pan during the resting period.
- Crowding the baking sheet. Placing cookies too close together causes them to merge into one another during baking. Always leave at least 2 inches of space between each dough ball so they can spread evenly without touching.
- Baking on a dark pan without lining it. Dark baking pans absorb more heat and cause cookie bottoms to over-brown or burn before the centers are done. Always use a light-colored baking sheet lined with parchment paper or a silicone mat for even baking.
Notes, Tips and Variations
Substitutions
You can swap the all-purpose flour for a 1:1 gluten-free baking flour blend if you need a gluten-free version. The texture will be slightly different but still very good. Make sure the blend you use contains xanthan gum for proper structure.
For a dairy-free version, use a high-quality vegan butter (stick form, not tub) in place of regular butter, and choose dairy-free chocolate chips. Many brands now make excellent dairy-free semi-sweet chips that melt beautifully. Your cookies will still be rich and delicious.
Dietary Variations
To make these cookies egg-free, replace the whole egg and extra yolk with 3 tablespoons of aquafaba (the liquid from a can of chickpeas). The result is slightly less chewy but still very flavorful. A flax egg (1 tablespoon ground flaxseed plus 3 tablespoons water, rested for 5 minutes) also works as a binding substitute.
If you want to reduce the sugar slightly, you can lower the white sugar to 1/4 cup without dramatically affecting the texture. Cutting into the brown sugar is not recommended, as it is essential for the moisture and chewiness of the final cookie.
Cooking Tips
Baking one sheet at a time in the center rack of your oven is strongly recommended. When you bake two sheets at once, the heat does not circulate as evenly, which leads to inconsistent browning. Take the extra time to bake in batches for the most consistent results.
Use a cookie scoop for uniform sizing so all your cookies bake at the same rate. Uneven sizes mean some cookies over-bake while others are still raw in the center. A large 3-tablespoon scoop is perfect for a bakery-style cookie. If you want crinkly, textured tops, roll the dough balls between your palms before placing them on the sheet rather than just dropping them directly from the scoop.
Topping Ideas and Flavor Boosters
The base recipe is perfect on its own, but these additions and toppings can make your Christmas chocolate chip cookies even more special and festive.
- Flaky sea salt – A small pinch on top of each warm cookie right out of the oven amplifies every flavor dramatically.
- Crushed candy canes – Press a few pieces onto the tops of the dough balls before baking for a festive peppermint flavor and a beautiful holiday look.
- Red and green M&Ms – Swap out half the chocolate chips for holiday M&Ms to add color and a slightly thicker chocolate coating in each bite.
- White chocolate chips – Mix in 1/2 cup of white chocolate chips alongside the semi-sweet for a sweet contrast and beautiful color variation.
- Dark chocolate chunks – Replace some or all of the chips with chopped dark chocolate for a more intense, sophisticated flavor.
- Espresso powder – Add 1 teaspoon to the dry ingredients to deepen the chocolate flavor without making the cookies taste like coffee.
- Cinnamon and nutmeg – A pinch of each added to the flour mixture brings warm holiday spice notes to the cookie.
- Toasted pecans or walnuts – Fold in 3/4 cup of chopped toasted nuts for crunch, warmth, and a classic holiday flavor combination.
- Dried cranberries – Add 1/2 cup for a tart, fruity burst that cuts through the richness of the chocolate beautifully.
- Drizzled white chocolate – Once the cookies are fully cooled, drizzle melted white chocolate over the tops and let it set for a bakery-quality presentation.
- Peppermint extract – Replace 1/4 teaspoon of the vanilla extract with peppermint extract for a classic chocolate-peppermint holiday cookie.
Who This Recipe Is For
- Holiday bakers who want a dependable, crowd-pleasing cookie recipe they can count on every Christmas season.
- Beginner bakers who are making cookies from scratch for the first time and want clear, foolproof instructions.
- Parents and grandparents looking for a fun, hands-on baking activity to do with kids during the holiday break.
- Cookie swap participants who want to bring something that stands out from standard recipes and earns genuine compliments.
- Gift givers who want to pack beautiful, homemade cookies into tins, bags, or boxes for friends, neighbors, and coworkers.
- Meal preppers and batch bakers who want to make a large quantity of dough ahead of time and bake fresh cookies throughout the holiday season.
- Chocolate lovers who believe every cookie should be absolutely loaded with rich, melty chocolate in every bite.
- Dessert enthusiasts who believe that the holidays are the perfect time to bake something truly indulgent and share it with people they love.
Storage and Meal Prep Tips
Refrigerator
Baked cookies can be stored in an airtight container at room temperature for up to 5 days. If you want to extend freshness slightly, you can keep them in the refrigerator in a sealed container for up to 7 days. Place a slice of white sandwich bread in the container alongside the cookies. The bread keeps the cookies moist by releasing just enough humidity to prevent them from drying out.
Raw cookie dough (before shaping) can be refrigerated in a covered bowl for up to 3 days. The dough becomes more firm as it chills, so you may need to let it sit at room temperature for 5 to 10 minutes before scooping if it is very cold and hard.
Freezer
Portioned raw cookie dough balls freeze perfectly for up to 3 months. Freeze them individually on a baking sheet first, then transfer to a zip-lock bag or airtight freezer container. Label with the date and the baking temperature and time so you do not have to look it up later. This is the ultimate holiday hack for having fresh cookies available whenever you want them.
Baked cookies can also be frozen for up to 2 months. Cool them completely first, then layer them between sheets of parchment in an airtight container. Thaw at room temperature for about 30 minutes before serving. You can also warm them in the oven for a few minutes to bring back that fresh-baked feel.
Reheating
To reheat baked cookies and restore that warm, gooey texture, place them on a baking sheet in a 300°F (150°C) oven for 4 to 5 minutes. This gently warms them through without drying them out or over-browning the bottoms. You can also microwave a single cookie for 10 to 15 seconds on a microwave-safe plate, though the texture will be slightly softer and less crisp at the edges.
For frozen baked cookies, let them thaw at room temperature first before reheating in the oven. Going straight from freezer to oven can cause the outside to warm too quickly while the center stays cold. A brief thaw of 20 to 30 minutes gives you a much more even result. how to freeze holiday baked goods
Nutrition Facts
The following nutrition estimates are based on one cookie, assuming the batch yields 24 cookies. Values are approximate and will vary based on specific brands and any substitutions or add-ins used.
| Nutrient | Per Serving (1 Cookie) |
|---|---|
| Calories | 215 kcal |
| Total Fat | 11g |
| Saturated Fat | 6.5g |
| Carbohydrates | 28g |
| Sugar | 18g |
| Fiber | 1g |
| Protein | 2.5g |
| Sodium | 120mg |
FAQs
Why are my Christmas chocolate chip cookies coming out flat?
Flat cookies are almost always caused by one of three things: butter that was too warm when mixed, skipping the dough chill, or too little flour. Make sure your melted butter is cooled to room temperature before mixing, always chill the dough for at least 30 minutes, and double-check your flour measurement by spooning it into the measuring cup rather than scooping directly. If your kitchen is very warm, even a 30-minute dough chill may not be enough. Try chilling for an hour or refrigerating the dough overnight.
Can I make the dough without chilling it?
Technically yes, but the results will not be as good. Without chilling, the fat in the dough is still very soft and the cookies will spread aggressively in the oven, resulting in thin, crispy edges with almost no rise or chew. If you are truly short on time, the minimum chill is 30 minutes. Even that short rest makes a noticeable difference compared to baking the dough immediately after mixing.
What type of chocolate chips work best in this recipe?
Semi-sweet chocolate chips are the gold standard for classic Christmas chocolate chip cookies because they balance sweetness with rich chocolate flavor. If you prefer a less sweet, more intense cookie, use dark chocolate chips or chopped 70% dark chocolate. For a sweeter, milder result, milk chocolate chips are a wonderful choice especially for kids. Mixing two types of chocolate, like semi-sweet chips and chopped dark chocolate, gives you the most complex and impressive result.
How do I keep my cookies soft for several days after baking?
Store cooled cookies in an airtight container with a slice of white bread. The bread acts as a moisture regulator and keeps the cookies from drying out and turning hard. You can also place a damp paper towel (folded and wrapped in plastic wrap so it does not touch the cookies) in the container for the same effect. Make sure the cookies are fully cooled before you seal them in the container, as trapping steam from warm cookies causes them to become soggy on the bottom.
Can I use salted butter instead of unsalted?
Yes, you can use salted butter in a pinch. If you do, reduce the fine sea salt in the recipe from 1 teaspoon to 1/2 teaspoon to avoid the cookies tasting overly salty. Keep in mind that different brands of salted butter contain varying amounts of added salt, so the final flavor may vary slightly. Unsalted butter gives you the most precise control over the salt level, which is why it is always the recommended choice in baking recipes.
Conclusion
These Christmas chocolate chip cookies are everything a holiday cookie should be – soft, chewy, loaded with chocolate, and made with simple ingredients you likely already have in your kitchen. From the first bite to the last crumb, they deliver the kind of warmth and joy that only a great homemade cookie can provide. Whether you are baking for a party, filling gift boxes, or just treating yourself, this recipe will not let you down.
The best part is how flexible this recipe is. You can keep it classic or dress it up with festive mix-ins, seasonal toppings, and creative flavor variations. You can prep the dough days ahead or freeze it for months, giving you maximum flexibility during the busiest time of the year. However you choose to bake them, the result is always a cookie worth celebrating.
So preheat that oven, melt that butter, and get ready to fill your home with the most incredible holiday aroma. You deserve a cookie this good, and so does everyone on your Christmas list. Happy baking and happy holidays.