THE BEST N°1 Heavenly Chocolate Peanut Butter Ooey Gooey Cake – Easy Dessert Recipe
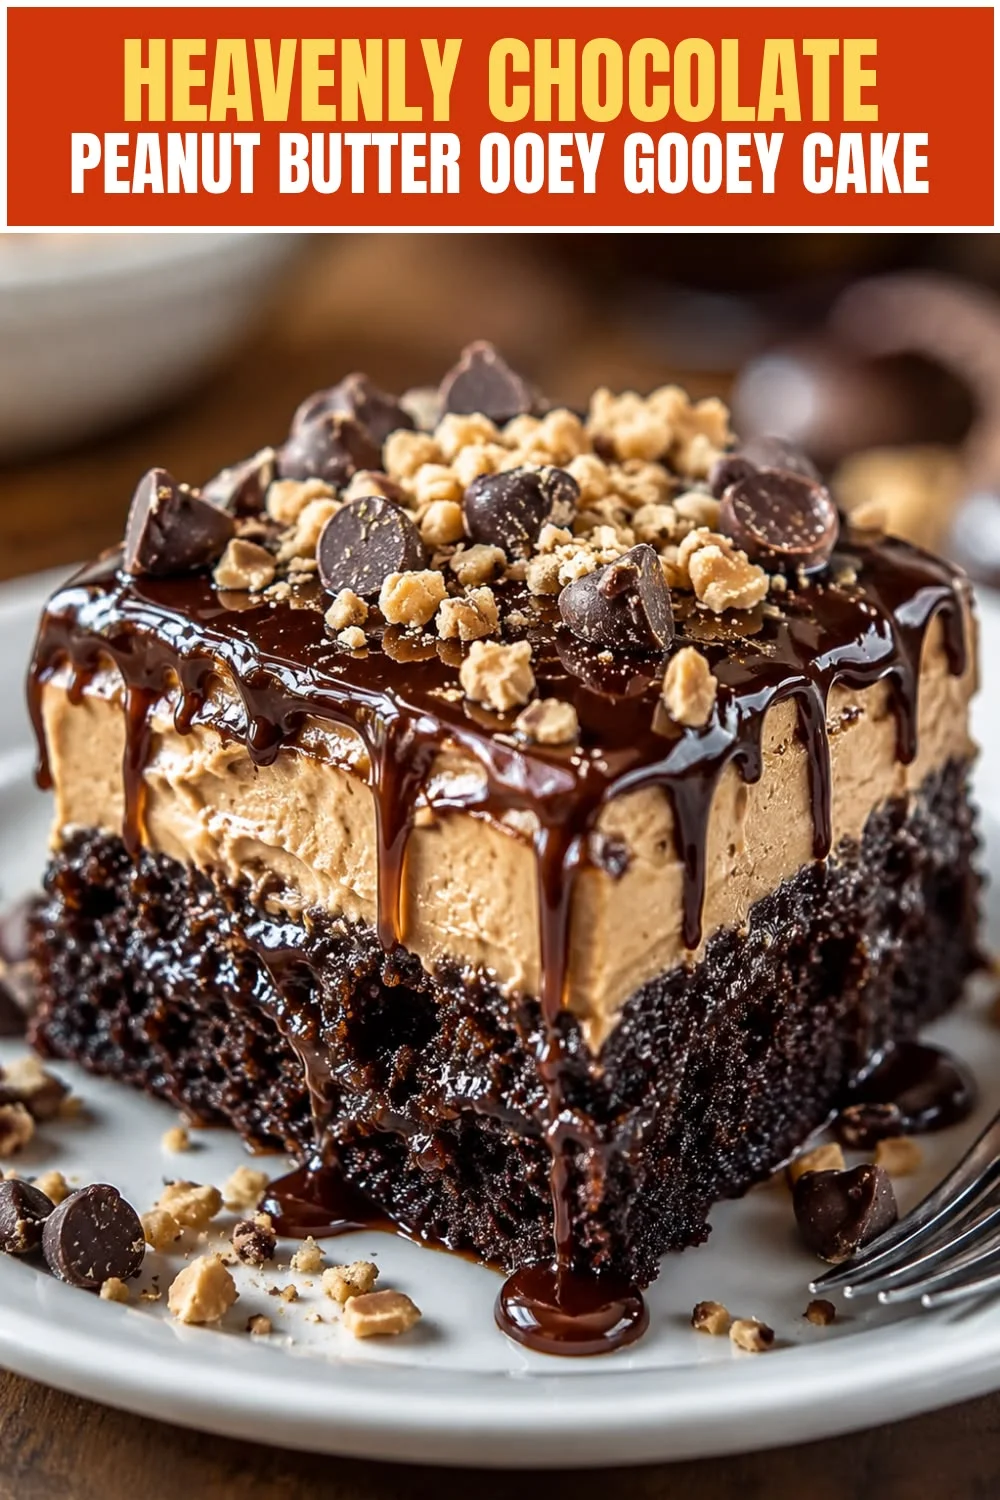
If you have ever dreamed of a dessert that combines rich chocolate with creamy peanut butter in one gloriously sticky, gooey bite, this Chocolate Peanut Butter Ooey Gooey Cake is everything you have been waiting for. It is the kind of dessert that makes people stop mid-conversation and ask, “Wait, what is this?” It is that good.
This recipe is perfect for dinner parties, family gatherings, potlucks, or any night when you want to end your meal with something truly unforgettable. You get the deep, fudgy satisfaction of a brownie meets the silky, slightly tangy richness of a cream cheese layer – all baked into one pan that feeds a crowd.
In this post, you will learn exactly how to make this crowd-pleasing cake from scratch, including tips to make it ahead, storage guidance, common mistakes to avoid, and so much more. Let’s get baking.
Table of Contents
Personal Note
I first made this cake on a cold Sunday evening when I needed something comforting after a long week. I had a box of chocolate cake mix, a block of cream cheese, and a jar of peanut butter staring at me from the pantry – and something just clicked. The result was absolutely magical.
What I love most about this dessert is how it bridges the gap between “fancy enough for guests” and “easy enough for a Tuesday night.” You do not need any special skills or equipment. Just a mixing bowl, a baking pan, and about 15 minutes of hands-on time.
Every time I bring this to a dinner table, the pan comes back empty. That is the only review you need. I hope this recipe becomes one of your go-to dinner desserts for years to come.
Origins of the Dish
The “ooey gooey cake” – sometimes called “gooey butter cake” – has roots deep in the American South, particularly in St. Louis, Missouri. The original version was reportedly created by accident in the 1930s when a baker mixed up the proportions of butter and flour. Instead of tossing it out, he served it anyway, and customers went absolutely wild for it.
That happy accident launched a dessert tradition that spread across the country. Over the decades, home bakers began experimenting with the base recipe, adding cream cheese for tang, different cake mix flavors for variety, and of course, beloved mix-ins like chocolate and peanut butter. The chocolate peanut butter version became a standout favorite at church potlucks, holiday dinners, and family cookouts throughout the South and Midwest.
Peanut butter itself has been a beloved American staple since the early 1900s, growing in popularity through wartime food rationing and post-war convenience cooking. Its combination with chocolate became one of the most iconic flavor pairings in American dessert culture, most famously celebrated with the launch of Reese’s Peanut Butter Cups in 1928. Bakers naturally started incorporating both into cakes, brownies, and bars as the decades progressed.
Today, the Chocolate Peanut Butter Ooey Gooey Cake sits comfortably in the category of beloved American comfort desserts. It is the kind of recipe passed down on handwritten index cards and shared at neighborhood dinners. It fits perfectly as a dinner table finale, offering richness and satisfaction that rounds out any hearty meal beautifully.
Why You’ll Love This Recipe
This recipe checks every box for a dessert that delivers big on flavor without demanding much from you in the kitchen. Here is exactly why it is going to become your new favorite.
- Incredibly easy to make: Most of the work involves mixing a few ingredients together. No complicated techniques required.
- Crowd-pleasing flavor combination: Chocolate and peanut butter is one of the most universally loved flavor pairings in dessert history.
- Perfect dinner dessert: Rich and satisfying without being overly fussy, making it ideal for serving after a hearty dinner.
- Feeds a crowd: Made in a 9×13 pan, this cake serves up to 16 people – perfect for family dinners and gatherings.
- Minimal dishes: You only need two bowls and a pan, keeping cleanup fast and simple.
- Make-ahead friendly: This cake actually tastes better the next day, making it ideal for prepping before a dinner party.
- Budget-friendly ingredients: Everything you need is affordable and likely already in your pantry or fridge.
- Freezer-friendly: Slice and freeze individual portions for easy dessert access all week long.
- Endlessly customizable: Swap flavors, add toppings, or adjust sweetness to your liking with minimal effort.
- Unforgettable texture: The contrast between the slightly crisp top layer and the gooey, fudgy inside is unlike any other cake you have tried.
Health Benefits and Ingredient Highlights
While this is absolutely a dessert meant to be enjoyed as an indulgence, several of its key ingredients do bring some genuine nutritional value to the table. Here is a closer look at what is inside your cake and why each ingredient earns its place.
Peanut Butter
Peanut butter is a powerhouse of plant-based protein and healthy monounsaturated fats, which support heart health and help keep you feeling full and satisfied. A two-tablespoon serving delivers roughly 7-8 grams of protein, making it one of the most protein-dense ingredients you can add to a dessert recipe.
It also contains important micronutrients like magnesium, potassium, and vitamin E, all of which play roles in muscle function, blood pressure regulation, and antioxidant protection. When you are enjoying a dessert after dinner, having some of that nutritional backbone makes the indulgence feel a little more balanced.
Choose a natural peanut butter with minimal added sugar and no hydrogenated oils for the best flavor and nutritional profile. The natural oils also blend more beautifully into the cake batter, giving you a silkier final texture.
Cocoa Powder and Chocolate Cake Mix
Cocoa powder is rich in flavonoids, a class of antioxidants that have been linked to improved blood flow, reduced inflammation, and better cardiovascular health. Dark cocoa in particular contains more of these beneficial compounds than lighter cocoa varieties.
The chocolate in this recipe also brings that deeply satisfying, mood-lifting quality that so many people associate with comfort eating. There is actual science behind the mood boost – chocolate stimulates the release of serotonin and endorphins, which is why a slice of this cake after a long dinner just feels so right.
Using a chocolate cake mix as the base layer streamlines the process while still delivering a rich, consistent chocolate flavor. If you prefer to bake from scratch, you can replace the mix with a homemade chocolate base using cocoa powder, flour, sugar, and baking soda.
Cream Cheese
Cream cheese forms the gooey, luscious top layer of this cake, and it does more than just taste incredible. It provides calcium and a small but meaningful amount of protein, contributing to the overall richness and density of each bite.
The fat content in cream cheese is what gives ooey gooey cake its signature texture. It bakes into a thick, fudgy layer that never quite sets all the way through, keeping the center irresistibly soft. Full-fat cream cheese works best here for both flavor and structure.
If you need a lighter option, reduced-fat cream cheese will still work in this recipe, though the texture will be slightly less dense. Neufchatel cheese is another excellent substitute that behaves very similarly in baking.
Eggs
Eggs are one of the most complete protein sources available, providing all nine essential amino acids your body cannot produce on its own. In baking, they serve as a binder, emulsifier, and leavening agent all at once, which is why this recipe calls for eggs in both layers.
The fat in egg yolks also adds to the moisture and richness of the final cake, while the whites contribute structure that keeps the gooey top layer from collapsing. Room temperature eggs always incorporate better into batters, so pull them from the fridge about 30 minutes before you start.
Butter
Butter adds depth of flavor, moisture, and a slightly golden, slightly crisp quality to the base layer of this cake. It also enhances the richness of the peanut butter and chocolate combination, tying all the flavors together into one cohesive, indulgent dessert.
Using melted butter (rather than softened) in this recipe keeps the base layer dense and fudgy rather than cakey and light. That intentional difference in texture is what makes ooey gooey cake unique from other bar-style desserts.
Ingredients
Here is everything you need to make this showstopping Chocolate Peanut Butter Ooey Gooey Cake. All quantities are written for a standard 9×13 inch baking pan, serving approximately 16 portions.
For the Base Layer:
- 1 box (15.25 oz) chocolate cake mix (substitute: devil’s food cake mix for a deeper chocolate flavor)
- 1/2 cup (1 stick / 113g) unsalted butter, melted (substitute: salted butter, just reduce any added salt)
- 2 large eggs, room temperature
- 1/2 cup creamy peanut butter (substitute: almond butter or sunflower seed butter for nut-free version)
- 1 teaspoon pure vanilla extract
For the Gooey Top Layer:
- 8 oz full-fat cream cheese, softened to room temperature (substitute: Neufchatel cheese for a lighter version)
- 1/2 cup creamy peanut butter (substitute: powdered peanut butter mixed with water for a lower-fat option)
- 2 large eggs, room temperature
- 1 teaspoon pure vanilla extract
- 3 cups (360g) powdered sugar, sifted (substitute: reduce to 2.5 cups if you prefer less sweet)
- 1/2 cup semi-sweet chocolate chips (substitute: dark chocolate chips for a richer flavor)
- 1/4 cup peanut butter chips (optional but highly recommended)
Optional for Topping:
- 2 tablespoons powdered sugar, for dusting
- 1/4 cup crushed peanuts or chocolate chips, for garnish
Step-by-Step Instructions
Follow these steps carefully and you will have a perfect Chocolate Peanut Butter Ooey Gooey Cake every single time. This recipe is beginner-friendly but delivers bakery-level results.
- Preheat your oven to 350°F (175°C). Grease a 9×13 inch baking pan generously with butter or non-stick cooking spray. You can also line it with parchment paper for easier removal and cleanup.
- Make the base layer. In a large mixing bowl, combine the chocolate cake mix, melted butter, 2 eggs, peanut butter, and vanilla extract. Stir everything together until a thick, slightly sticky dough forms. Do not overmix – just stir until no dry streaks remain.
- Press the base into the pan. Transfer the base layer dough into your prepared baking pan. Use your hands, a spatula, or the bottom of a measuring cup to press it into an even layer across the bottom of the pan. It will be thick and dense – that is exactly right.
- Make the gooey top layer. In a separate large mixing bowl, beat the softened cream cheese and peanut butter together using a hand mixer or stand mixer on medium speed until smooth and completely combined. This should take about 1-2 minutes. Make sure there are no lumps from the cream cheese before moving forward.
- Add the eggs and vanilla to the top layer. Add the 2 remaining eggs and vanilla extract to the cream cheese mixture. Beat on low speed until just incorporated. Scrape down the sides of the bowl as needed to ensure everything is mixed evenly.
- Mix in the powdered sugar. Add the sifted powdered sugar to the cream cheese mixture one cup at a time, mixing on low speed after each addition. Once all the sugar is incorporated, increase speed to medium and beat for about 30 seconds until the batter is smooth and thick.
- Fold in the chocolate chips and peanut butter chips. Using a rubber spatula, gently fold the semi-sweet chocolate chips and peanut butter chips into the cream cheese batter. Distribute them as evenly as possible throughout the mixture.
- Pour the top layer over the base. Spoon and spread the cream cheese mixture evenly over the pressed base layer in the pan. Use a spatula to smooth the top as much as possible, making sure it reaches all four corners of the pan.
- Bake for 40-45 minutes. Place the pan in your preheated oven and bake until the edges are set and slightly golden, but the center still has a gentle wobble when you shake the pan. The center should not be fully set – that gooey middle is the whole point of this cake, so do not overbake it.
- Cool completely before cutting. Remove the pan from the oven and allow the cake to cool at room temperature for at least 30 minutes. Then transfer to the refrigerator and chill for a minimum of 1 hour before slicing. Cutting into it while it is still warm will result in messy, unstable slices. Patience pays off here.
- Dust and serve. Once fully chilled and set, dust the top lightly with powdered sugar and scatter on any optional garnishes like crushed peanuts or extra chocolate chips. Slice into 16 squares and serve directly from the pan or transfer to a platter for a more elegant dinner table presentation.
Make It Ahead and Batch Prep Guide
This Chocolate Peanut Butter Ooey Gooey Cake is genuinely one of the best make-ahead desserts you can have in your dinner prep arsenal. The flavors actually deepen and improve overnight as the layers meld together in the refrigerator. If you have a dinner party or holiday meal coming up, baking this the day before is absolutely the right move.
To prep ahead, simply bake the cake, allow it to cool completely at room temperature, then cover the pan tightly with plastic wrap or aluminum foil and refrigerate. It will keep beautifully for up to 4 days in the fridge. Hold off on adding the powdered sugar dusting or any fresh garnishes until just before you are ready to serve, so everything looks fresh and presentable at the dinner table.
For batch cooking, this recipe doubles easily. Simply use two 9×13 pans and follow the same method. One pan can go to your dinner table while the other gets sliced, individually wrapped, and frozen for future use. Each frozen slice can be pulled out the night before and thawed in the refrigerator overnight for a ready-to-serve dessert on any busy weeknight.
If you are prepping for a larger crowd or multiple events, you can also bake the base layer and gooey layer separately, store them in the fridge unbaked, and assemble and bake the day of your dinner. The base layer dough can be pressed into the pan and covered with plastic wrap up to 24 hours in advance, and the cream cheese batter can be stored in a bowl with plastic wrap pressed directly onto the surface to prevent a skin from forming.
Common Mistakes to Avoid
Even simple recipes like this one have a few pitfalls that can affect your final result. Avoid these common mistakes to make sure your cake turns out perfect every time.
- Overbaking the cake: This is the number one mistake people make with ooey gooey cake. If you bake it until the center looks fully set, it will be dry and cakey instead of gooey and fudgy. Pull it out when the edges are set but the center still has a slight wobble.
- Using cold cream cheese: Cold cream cheese will not mix smoothly and will leave lumps in your gooey layer. Always allow it to sit at room temperature for at least 30 minutes before you start, or microwave it in 10-second bursts until it is soft enough to blend.
- Skipping the chilling step: Cutting into the cake while it is still warm will result in a messy, shapeless slice. The chilling step is not optional – it is what gives the cake its structure and makes clean, beautiful slices possible.
- Not sifting the powdered sugar: Unsifted powdered sugar can clump in the batter and create an uneven texture in the gooey layer. A quick sift takes less than two minutes and makes a noticeable difference in the smoothness of your finished cake.
- Using a too-small pan: If you use anything smaller than a 9×13 pan, the layers will be too thick and the center will not bake evenly. Stick to the recommended pan size for reliable results.
- Using natural peanut butter that has not been stirred: Natural peanut butter that has separated oil sitting on top will affect the texture of both layers. Always stir your natural peanut butter thoroughly until it is completely smooth before measuring and using it in this recipe.
Notes, Tips and Variations
Substitutions
If you do not have a chocolate cake mix on hand, you can use a devil’s food cake mix, fudge brownie mix, or even a yellow cake mix for a more classic gooey butter cake base. Each option will produce a slightly different but equally delicious result.
For a nut-free version, swap both the peanut butter portions for sunflower seed butter or soy butter. The texture and fat content are similar enough that the cake will behave the same way in the oven, though the flavor will be slightly different. You can also use tahini for an unexpected twist that pairs beautifully with the chocolate layer.
Dietary Variations
To make a gluten-free version, simply swap the chocolate cake mix for a certified gluten-free chocolate cake mix. Brands like King Arthur, Bob’s Red Mill, and Pillsbury all offer reliable gluten-free options that perform well in this type of recipe. Everything else in the ingredient list is naturally gluten-free.
For a dairy-free version, use a dairy-free cream cheese (such as Violife or Kite Hill), vegan butter, and dairy-free chocolate chips. The texture may be slightly softer than the original, but it will still be incredibly delicious. This variation is a great option to have ready for dinner guests with dietary restrictions.
Cooking Tips
Always use room temperature eggs and cream cheese. This single habit makes the biggest difference in the smoothness and consistency of your batter, and it ensures both layers blend together without creating air pockets or lumps.
If your peanut butter is very thick and stiff, warm it slightly in the microwave for 15-20 seconds before adding it to the batter. This makes it much easier to incorporate evenly without having to overmix the batter, which can affect the final texture of both layers.
For extra-clean slices when serving at a dinner party, run a sharp knife under hot water, wipe it dry, and slice through the chilled cake in one smooth, downward motion. Repeat between each cut for perfectly neat edges that look gorgeous on a platter.
Topping Ideas and Flavor Boosters
Take your Chocolate Peanut Butter Ooey Gooey Cake to the next level with one or more of these delicious finishing touches. Each option adds a new dimension of flavor, texture, or visual appeal.
- Drizzled melted dark chocolate: Melt 1/4 cup of dark chocolate chips and drizzle over the top of the cooled cake for a glossy, elegant finish.
- Warm peanut butter drizzle: Thin a few tablespoons of peanut butter with a little coconut oil and drizzle it over the cake in a zigzag pattern for visual impact and extra peanut flavor.
- Crushed Reese’s Peanut Butter Cups: Roughly chop a handful of Reese’s cups and scatter them over the top of the cake after baking and cooling for a classic flavor combination.
- Flaky sea salt: A light sprinkle of flaky Maldon sea salt over the top balances the sweetness and makes the chocolate and peanut butter flavors pop dramatically.
- Whipped cream: Serve each slice with a generous dollop of freshly whipped cream for a lighter contrast to the dense, rich cake.
- Vanilla ice cream: Warm a slice of the cake slightly and serve it with a scoop of vanilla bean ice cream for a restaurant-worthy dinner dessert experience.
- Chopped roasted peanuts: Add crunch by scattering a handful of chopped, lightly salted roasted peanuts across the top of the cake before serving.
- Caramel sauce drizzle: A slow drizzle of salted caramel sauce adds a buttery, rich layer of flavor that plays beautifully against the chocolate and peanut butter.
- Rainbow sprinkles: If you are serving this at a birthday dinner or celebration, a handful of colorful sprinkles makes it instantly festive and fun.
- Cocoa powder dusting: Instead of powdered sugar, try a light dusting of unsweetened cocoa powder for a more intense, less sweet presentation.
- Mini chocolate chips pressed into the surface: Before baking, press a handful of mini chocolate chips into the surface of the gooey layer for a melted, embedded chocolate effect.
Who This Recipe Is For
This recipe is wonderfully versatile and suits a wide range of people and occasions. If any of the following describe you, this cake belongs in your recipe collection.
- Busy parents who need a fast, crowd-pleasing dessert they can make ahead and have ready after dinner without any last-minute stress.
- Beginner bakers who want to impress family and friends with something that looks and tastes professional but requires very little baking skill or experience.
- Dinner party hosts looking for a showstopper dessert that can be prepped entirely the day before and served straight from the fridge.
- Chocolate and peanut butter lovers – this is perhaps the most obvious audience, and this cake will quickly become their absolute obsession.
- Meal preppers who want to batch-cook a week’s worth of desserts and have individual servings ready to pull out of the freezer on demand.
- Holiday and potluck contributors who need a reliably delicious, crowd-sized dessert that travels well and holds up beautifully at room temperature for a few hours.
- Gluten-free and dairy-free bakers who want a flexible recipe that adapts easily to their dietary needs without sacrificing flavor or texture.
- Anyone who values simplicity and wants a dessert that delivers maximum reward with minimal effort and minimal cleanup.
Storage and Meal Prep Tips
Refrigerator
Store leftover cake in the baking pan covered tightly with plastic wrap, or transfer individual slices to an airtight container. The cake will keep in the refrigerator for up to 4-5 days without any significant loss of quality. In fact, many people find it even more delicious on day two after the flavors have had time to settle and meld together.
Keep it toward the back of the refrigerator rather than in the door, where temperature fluctuations are more common. The steady cold temperature helps the gooey center maintain its texture and prevents the top layer from becoming too soft or sticky.
Freezer
This cake freezes exceptionally well, making it one of the best desserts for long-term dinner meal prep. Once the cake is fully cooled and chilled, slice it into individual portions and wrap each slice tightly in plastic wrap. Place the wrapped slices in a zip-top freezer bag or airtight freezer container and freeze for up to 3 months.
Label the container with the date so you always know how long it has been stored. For the best texture after freezing, allow slices to thaw in the refrigerator overnight rather than at room temperature, which can cause the gooey layer to weep moisture onto the surface.
Reheating
If you prefer your cake warm, you can gently reheat individual slices in the microwave on 50% power for 20-30 seconds at a time until warmed through. Be careful not to overheat, as the gooey layer can become too liquid and lose its fudgy texture. A gentle warm-through is all you need.
Alternatively, place a slice on an oven-safe plate and warm it in the oven at 300°F for about 5-8 minutes. This method produces a slightly crispier edge on the base layer while keeping the center soft and gooey. Serve warm with a scoop of ice cream for the ultimate dinner dessert experience. Easy Brownie Ice Cream Sandwiches Recipe
Nutrition Facts
The following nutrition information is calculated per serving, based on 16 servings from one 9×13 pan. Values are approximate and will vary depending on specific brands and any substitutions used.
| Nutrient | Per Serving |
|---|---|
| Calories | 385 kcal |
| Total Fat | 20g |
| Saturated Fat | 9g |
| Protein | 7g |
| Total Carbohydrates | 48g |
| Dietary Fiber | 1.5g |
| Total Sugar | 36g |
| Sodium | 280mg |
| Cholesterol | 65mg |
This dessert is best enjoyed as an occasional indulgence after dinner. If you are tracking macros or managing specific dietary needs, you can reduce the powdered sugar by half a cup to lower the carbohydrate and sugar content without dramatically affecting the texture. Lower Sugar Dessert Swaps for Dinner Parties
FAQs
Can I use crunchy peanut butter instead of creamy?
Yes, you can absolutely use crunchy peanut butter in this recipe if you prefer a bit of texture in each bite. The small peanut pieces will distribute throughout both layers and add a pleasant crunch that contrasts nicely with the gooey, fudgy interior. Just make sure it is fully stirred and at room temperature before mixing it in, especially if it is a natural variety with separated oil.
Why is my cake not gooey in the middle?
The most common reason is overbaking. Every oven runs slightly differently, so start checking your cake at the 38-minute mark. The center should still wobble slightly when you gently shake the pan – that is exactly what you want. If you bake until the center looks completely set and firm, the gooey texture will have already been baked away, resulting in a more cakey, dry texture. Trust the wobble and pull the cake out early.
Can I make this recipe without a box of cake mix?
Absolutely. To make the base from scratch, combine 1.5 cups all-purpose flour, 1 cup granulated sugar, 1/2 cup unsweetened cocoa powder, 1 teaspoon baking powder, and 1/2 teaspoon salt. Use this dry mixture in place of the boxed cake mix, keeping all other base layer ingredients the same. The result will be a slightly denser base layer but with excellent homemade flavor that many bakers actually prefer.
How far in advance can I make this cake for a dinner party?
You can make this cake up to 2 days before your dinner party and it will taste just as good, if not better, than it does on the day it is baked. Store it covered in the refrigerator and hold off on adding any fresh garnishes or powdered sugar dusting until about 30 minutes before you plan to serve it. This keeps the presentation looking fresh and polished for your guests.
Can I make individual portions instead of one large pan?
Yes, and this is actually a brilliant idea for dinner parties where you want elegant individual servings. Line a standard 12-cup muffin tin with cupcake liners, divide the base layer dough evenly among the cups (about 2 tablespoons each), then top with the cream cheese mixture. Bake at 350°F for 18-22 minutes, checking for the same slight wobble in the center. These individual gooey cups are gorgeous served on a dessert plate with a dusting of powdered sugar. Individual Dessert Cup Recipes for Dinner Entertaining
Conclusion
This Chocolate Peanut Butter Ooey Gooey Cake is the kind of dessert that earns a permanent spot in your dinner recipe rotation. It is easy enough for a weeknight but impressive enough for a dinner party. The combination of fudgy chocolate base, creamy peanut butter gooey top, and that irresistible melt-in-your-mouth texture makes every single bite feel like a celebration.
Whether you are serving it warm with ice cream after a Sunday roast, slicing it cold from the fridge for a weeknight treat, or bringing it to your next potluck dinner, this cake always delivers. It is one of those recipes that people taste once and immediately ask you to bring again to every gathering from that point forward.
Give this recipe a try the next time you want to end your dinner on a truly unforgettable note. Share it in the comments below if you make it, and let me know what toppings or variations you tried. Happy baking!